| Our
First Solar Hot
Water
Project |
|||||||||
|
There are lots of great reasons to supplement your home energy needs with solar
power. They include the ability to offset rising natural gas and electricity
costs (that will continue as our limited fossil fuel reserves are exhausted) as
well as taking care of our planet's environment. In addition, solar power
provides a backup when conventional power sources go down. Best of all, there is
a lot of fun, satisfaction and independence that comes from adding solar energy
to your lifestyle. It is a fun hobby with lots of environmental and economic
payback! I live in
a conventional ranch home with a neighborhood association, so appearance is as
important as functionality. In addition, I have no plumbing and minimal carpentry
experience, I don't own a soldering torch, so the project has
to be easy to build.
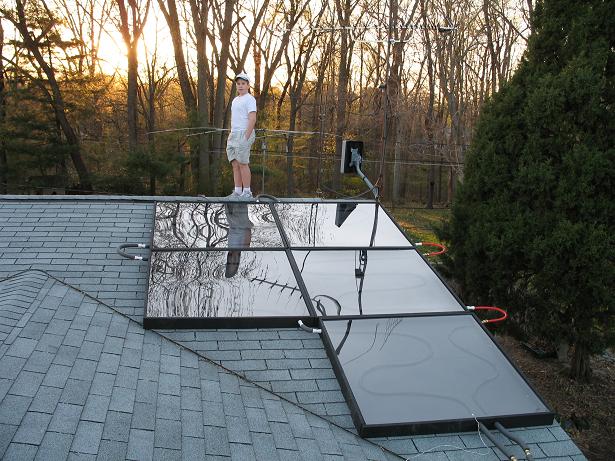
For maximum freeze protection and ease of installation, I decided on a drain back system where the water drains back by gravity to a small tank when the pump is not on. In scoping out my roof, I found that 5, 4' X 4' panels fit nicely:
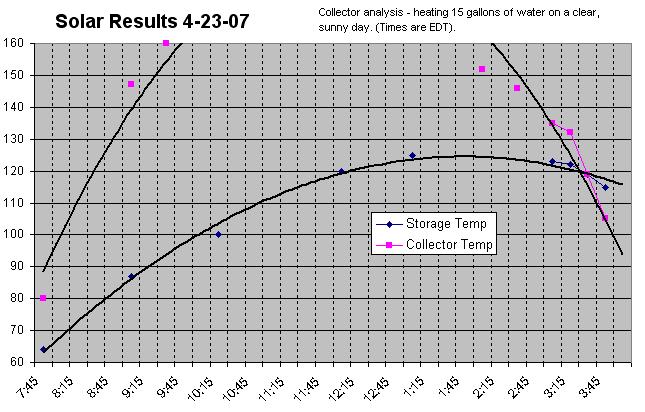
In early testing, the system works great! For the first test, I cycled about 15 gallons of water through the collector. Unfortunately, I wasn't able to take as many readings during the day as I had hoped, but Excel's polynomial function filled in the blanks nicely. The temperature sensor in the collector only goes to 160 degrees, so I really don't know how hot the sensors got. The water temperature rose from 64 degrees to over 100 by 10:30 AM, peaking out at 125 degrees about 12:15 PM EDT. I'm certain that I could have raised the water temperature more, but my test tank is a largely uninsulated fish tank with an open top, and heat was pouring out of it. By the way, the collectors are oriented east. Here are the results:
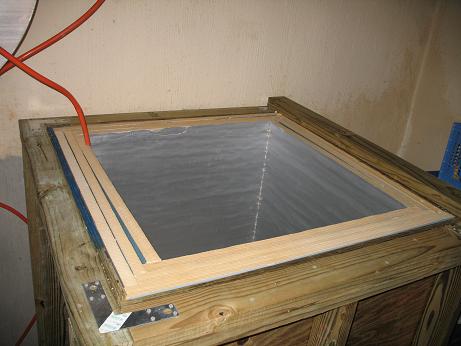
Construction was easy. My family and I built all five panels in a single weekend with time to spare. We decided on 4' X 4' panels since they would be easier to handle than 4' X 8'. Here are the basic steps: 1. We purchased 3 sheets of 4' X 8' X 1/2" treated plywood and Lowes was kind enough to cut the plywood in half to create nice, square 48" X 48" pieces. 2. I couldn't find 1" X 3" treated lumber, so we used untreated and gave it a coat of paint. We screwed the 1" X 3" lumber next to the edge on the flat portion of the 48" X 48" plywood to make the frame that the acrylic rests on. 4. Treated 1" X 4"s were attached around the outside of the 1" X 3"s and plywood. The acrylic sits inside the 1" X 4"s and rests on the 1" X 3"s, which, sitting on the plywood, come to about 1/2" of the top of the 1" X 4"s. 5. We placed 1" styrofoam insulation inside the panels. 6. Thin aluminum flashing was placed on top of the insulation and screwed in. 7. I bought 2, 60' rolls of 1/2" (5/8" O.D.) flexible copper tubing from Lowes. Lowes also sold a spring that you place around the tube when you bend it to keep it from kinking. As long as you place the spring in the right direction it works well and is easy to slide to the next position. I also bought an inexpensive pipe cutter that works very well. 8. The pipe was bent to zigzag zag through the collectors. The path is always down hill so that the water will drain back when the pump stops. We attached the pipe by drilling small holes through the collector on either side of the pipe about every foot, feeding 10 or 12 gauge wire through the holes, wrapping it round the pipe and twisting as tight as possible. Good contact with the aluminum is important since you want to pull as much heat off of it as you can. 9. The panels were painted flat black (spray paint works better on the aluminum) and put into position. 10. The pipes were connect by short runs of PEX tubing. We tried two different types of connectors. Shark Bite connectors (available at Home Depot) worked great with both types of the PEX that we had as well as the copper tubing. No soldering or special tools (except for a $1.50 plastic tool that you need when you want to disconnect the connectors) are required. Just push the pipe into the connector and it is a secure connection with no leaks at all. You can easily disconnect the pipe (as long as you have the tool) and reuse the connector anytime you want. For someone like me with no plumbing skills, the Shark Bite connectors are a dream come true! All the lumber was bought locally. Here are the links to the other items used: I used 1/8" Acrylic since this is my first test. It is UV protected so I'm hopeful it will last. They also have a more heat tolerant option, Clear Lexan® Polycarbonate Sheeting, that while a little more expensive is also reasonably priced. They can ship up to 3, 48" X 48" sheets via UPS. Since I needed 5 sheets, U.S. Plastics was kind enough to split the order in two, which was still much cheaper than shipping via motor freight. ** Update - SunTuf - availabe locally at most Home Depots is a much cheaper alternative that many guys are using for solar projects these days! ** The drain back system has lots of great advantages. The two disadvantages are that it has to be carefully designed so that everything is down hill and you need a stronger pump. I used the Taco 009 pump which can pump up to 34' high while still being low flow purchased from PexSupply.com. They also provided the flanges and compression fittings I needed to connect the pump to the PEX tubing. No soldering! I've tried two different types of 1/2" PEX tubing. The HousePEX, is light and flexible, but doesn't hold its shape after being bent. PEX-AL-PEX is more rigid, but stays where you want it. Overall, I like the PEX-AL-PEX better, but for short connections I like the HousePEX. Thermal Storage
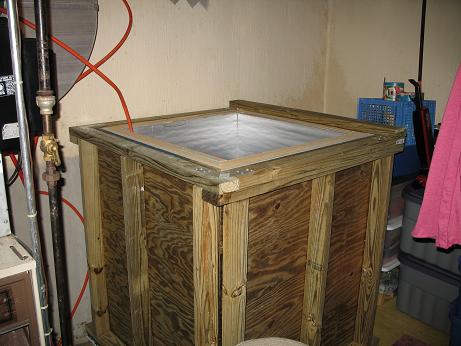
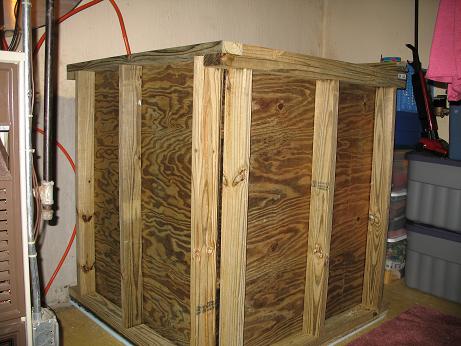
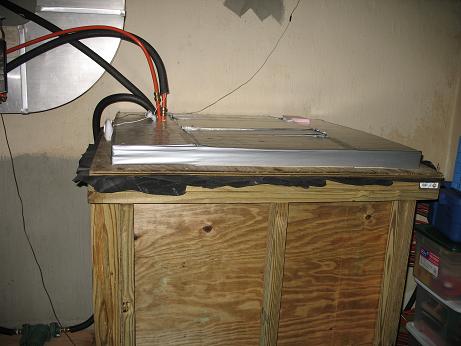
For thermal storage, I built a 200 gallon water tank in the basement. The outside dimentions are 4 X 4 X 4, but by the time insulation and framing is subtracted the storage is down to 200 gallons. I'll let the pictures tell this part of the story:
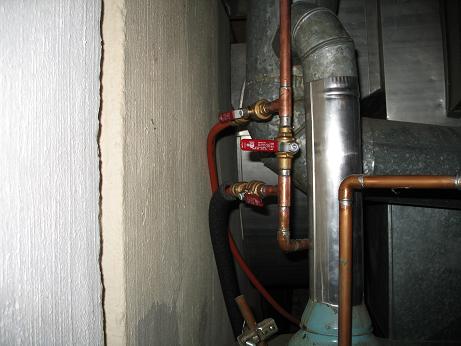
This last picture is the top of our conventional hot water heater. The copper pipe coming from the top is the feed of cold town water coming into the house. The first T gives me the option of sending the water to be preheated by the thermal storage tank. The bottom T is the return from the thermal storage tank. From there, preheated water enters our conventional water heater. By opening the top and bottom valves and closing the middle valve, water is directed to the thermal storage tank. If I ever need to bypass the thermal storage tank, I can just close the top and bottom valves and open the middle valve. Inside the thermal storage tank I have 300 feet of PEX-AL-PEX in a coil that our useable water passes through to obtain heat from the water that circulates through the collector. The water that we use in the house is never mixed with the water that circulates through the collector. In building my thermal storage tank I used many of these construction techniques: http://www.builditsolar.com/Projects/SpaceHeating/SolarShed/Tank/Tank.htm SimplySolar - Solar Forum and E-mail Groups! It
turns out that there are other folks like me who also enjoy
sharing ideas and learning from each other's experiments! If you have an interest in brainstorming
solar projects that are easy and inexpensive to build and
neighborhood friendly, or want some help with a project that you have
underway, please join us!
I originally set up an e-mail group - SimplySolar, for that purpose. The e-mail group has served us well, but with overwhelming growth and interest in the e-mail group, to better keep content organized and give members the option to easily follow only the threads that interest them, we have just set up a new Simply Solar on line forum! SimplySolar is about brainstorming and sharing ways to implement solar heat in easy ways that the average homeowner, who may not be much of a "do-it-yourselfer" (like me), can use to put money back in their pockets, green back in the environment and have a lot of fun along the way! If solar excites you, we would love to have you join our forum: Click to visit or join the Simply Solar Forum or subscribe to our e-mail group!
|