Solar
Frequently Asked Questions
For the most part, the following information is not provided by professionals, but rather a bunch of enthusiastic amateurs. Please use it accordingly! If you need more information; your questions, no matter how basic, are welcome on our SimplySolar e-mail group. If you aren't already a member, please join us!
** I
have an interest in solar space heating and/or solar domestic hot
water heating, but is pursuing solar really worthwhile?
You bet it is! Here are just a few of the many good reasons to enjoy solar. Solar offers:
- A measure of self sufficiency. It's great to have another option to keep our families warm during the winter and have hot water all year.
- An opportunity to be good stewards with our planet Earth and a way to leave a thriving habitat for our children and theirs. There is only so much fossil fuel here and once it is gone, it's gone. We may be creating other problems for ourselves along the way as we burn fossil fuels (pollution, global warming, etc).
- An inexhaustible fuel supply. Eventually, clean, renewable alternatives will be the only alternatives. It's a huge issue, and the fact that anyone can use inexpensive, readily available materials to help fix the problem is wonderful! The sun is strong, it provides lots of useful heat and rises every morning.
- A tremendous amount of reward, enjoyment and satisfaction! I can't stress this enough! While solar is the right thing to do for a whole host of reasons, one of the best is that solar is REALLY FUN, interesting and exciting! There is a genuine, lasting thrill by getting free heat, courtesy of the sun, especially with a project that you've built yourself! Your friends will be impressed too!
- An inexpensive hobby with a great return!. You can build simple solar systems for a song, but in the grand scheme, even investing several thousand dollars in solar is money very well spent. I've enjoyed Amateur Radio since I was 14 years old, I'm into astronomy, astrophotograpy and I have a very nice telescope. I've invested more than double in each of those other interests than what I have in solar. I can honestly say that working on solar projects has given me the most fun I've had in any hobby I've undertaken! Solar is very fun, interesting, it creates a learning environment with lots of opportunity for experimentation, returns your investment many times over and it is tremendously satisfying.
- A great payback! I haven't mentioned much about saving money. Having a hobby that pays us back many times our investment to enjoy is a GREAT additional benefit, but even if solar didn't pay us back, it's the right thing to do because it is clean, renewable, fun and interesting. Putting dollars back in our pockets is just icing on the cake!
Building solar projects
gives us the opportunity to stay warmer, save money, think, learn,
brainstorm, connect with others
who share our interest and enjoy first hand, the fruits of our
time spent on our solar hobby. There is nothing quite like
feeling the free hot air blowing out of your collector across your
hands, heating your home or taking a hot shower with water heated
by your project! Our solar projects will continue to give
us that wonderful return for decades. Building solar projects is a fun hobby that takes
care of our planet and pays us too! Solar projects are very worthwhile and time well spent.
** Can you briefly explain in simple terms how solar works?
When the sun shines on things they get hot. If the material is black, it absorbs more of the sun's energy and gets even hotter. If the black material is insulated under a clear glazing such as glass, Plexiglas, polycarbonate, etc., it gets REALLY hot, even in the dead of winter! All we are doing is taking the heat that the sun freely provides daily and using air or liquid to pull the heat off of the hot material and transport it to a place where we need it.
Here is some more basic solar information and a tour of the solar projects at our house in a YouTube video:
**
Is it worth getting started with solar on a small scale?
Yes, solar is an excellent supplement to traditional heating methods and integrates seamlessly with existing, conventional systems. When your solar space heater is warming your house so that your conventional heat runs less often, or your solar warmed hot water has your hot water heater running less, you are saving money and helping the environment. Even if you start with one small solar panel, you'll gain confidence and experience with solar, and every BTU that panel generates is one less BTU that you will have to pay for.
** I'm
not really a "do it yourselfer". Are solar collectors
hard to build?
No! In
fact, the only power tools used to build our first solar hot air
collector were a drill and jig saw. All the parts and materials
you'll need are readily available at your local hardware store or
ordered on line (links to on-line sources are at the bottom of this
FAQ).
** I've read enough already and I'm ready to get started! Is there an easy to build, inexpensive, high performing hot air collector design that you would recommend?
Yes, there are
actually two designs I would recommend. Based on our side
by side testing, collectors with window screen inside to transfer
the heat have worked the best so far. For a traditional, 4' X 8' design, I would build a collector with a two or three layer,
screen absorber.
- Best comparative performance
- Least expensive by far (a 25 foot roll of 4 foot wide, aluminum screen
is only about $29 at Home Depot). Fiberglass screen is even
cheaper and performs great, but we are uncertain about the paint
at really high temperatures.
- Easiest, quickest build by far
- Lowest pressure drop (least resistance to airflow besides a black
box) That means you can get a higher airflow for better efficiency than
you would experience with the same sized fan and other collector types.
Here are examples of how to build a screen collector:
My two layer, fiberglass screen collector: http://groups.yahoo.com/group/SimplySolar/photos/album/1082811597/pic/list?mode=tn&order=ordinal&start=1&dir=asc
Gary Resa's, three layer screen collector: http://www.builditsolar.com/Experimental/AirColTesting/ScreenCollector/Building.htm
A YouTube video detailing the screen absorber construction:
For a long, low collector, I would build an aluminum downspout design.

- Good performer. We don't have side by side comparative
performance numbers, however, Scott Smith did some very detailed
measurements and calculations that show the aluminum downspout design works
really well. You'll find complete construction details and
Scott's data documenting the performance at the bottom of the page here: http://www.n3fjp.com/solar/solarhotair.htm
- Very easy to build
- Downspout material lends itself to a long, low construction design.
This gives almost unlimited flexibility in design dimension
options.
**
I'd like to explore a list of all the common solar hot air collector
designs. Can you give me a summary of those designs and an
idea of their relative performance?
You bet, Gary has all the latest data here:
http://www.builditsolar.com/Experimental/AirColTesting/Index.htm
While you are there, be sure to click the link to my YouTube video, outling the design characteristics of a high performance, hot air collector!
** Solar
hot air, solar hot water and solar electric are all options. Which
is best?
All three options are great projects, I've built all three and they each have their advantages. One of the goals of the SimplySolar e-mail group is to keep solutions as simple as possible, so air and water based systems get the most focus here. They are very safe, much less expensive and offer a much quicker payback.
Air and water based panels of the same size each capture about the same amount of heat. These are the main points to consider in choosing:
Factors to consider for Air:
Air Pros:
- Very easy
to build
- Freeze protection is unnecessary
- Least expensive
with quickest payback
- No need for thermal storage as heat is
used immediately
- Almost instant heat when the sun is shining
Air Cons:
- Panels
usually are situated nearer the house, though good success has been
obtained with outdoor buried
ductwork
- Thermal storage is more difficult
- Larger
ductwork required
- Larger holes in house
- Difficult
to use for solar domestic hot water
Factors to consider for Water (hydronic):
Water Pros:
- Lots
of flexibility in panel placement
- Build as big as you
like
- Easy to bring small pipes into house
- Easily
transport heat where you want
- Ability to store heat in
an easy to construct thermal storage tank (which can be used simultaneously
for domestic hot water and space heating)
- Still have
heat on cloudy days (as long as there aren't too many in a row)
-
Heat can be distributed in a more controlled and comfortable
manner by installing an under floor radiant heat system
- Easier
to insulate pipe
- By using the panels for both space heating
and hot water, they are useful year round
Water Cons:
- Slightly
more difficult to build than air, but not much more.
- Freeze
protection is required - accomplished by either installing a drain
back system so that the water is in a warm environment when the
sun isn't shining or adding antifreeze and leaving the water continually
in the loop.
- If you want to store heat (optional), you'll
need a thermal storage tank. They are easy and inexpensive
to build, but they will require some space in your basement, crawl
space, garage or outdoors.
- For space heating, you'll
need to install a distribution system such as under floor radiant
heat or baseboard heat (but that can be done easily and inexpensively).
In summary, for an inexpensive infusion of quick heat as long as the sun is shining, air is a great option. For a more controlled distribution of heat with storage and the ability to heat your solar domestic hot water, a water system is the way to go. They both have their place and I'm happily using both here.
**
What is the easiest solar project to start with and what is
a reasonable progression of solar projects?
Every home is different, as are the goals of each solar enthusiast, but generally speaking, the average person's progression through solar projects over time, considering ease, cost, effort and complexity might be something like this:
1. Build a hot air collector for winter space heating. You can start small and heat a single room, or build a larger panel to heat more of your home. It will take care of your space heating needs during the sunlight portion of every sunny day. It's very easy and inexpensive to build - just an inexpensive collector array, fan, snap switch and ducting. Freeze protection is not a concern. Simply vent the heat into the daytime living space where you spend the most time, or optionally vent it to multiple rooms. You could stop right here at step 1 or 1A and enjoy very meaningful benefits from solar for decades.
1A. For those who don't want or need thermal storage but want to distribute their heat via under floor radiant, instead of building a hot air collector, build a hydronic (water) collector, circulate the heated water through an under floor radiant system and then back out to the collector. No thermal storage tank needed.
2. Solar domestic hot water. You'll need a thermal storage tank, so this requires more space and there is more complexity to the system. Not that it is hard - it's not, but there is more involved. While most of us spend more on space heating than domestic hot water heating, the payback for domestic hot water heating is still very good since hot water is used year round. The thermal storage tank for solar domestic hot water should be kept small enough to easily maintain a high temperature (ideally in the neighborhood of 120F) - probably 200 gallons or less.
3. Space heating with thermal storage. This is a big project. You'll need a collector larger than 15% of the square footage of your home before thermal storage even becomes a consideration - 255 square feet of collector for a 1,700 foot square foot home. The tank has to be large, but it can be kept at a lower temperature and still be effective for under floor radiant heat (90F). That will increase the efficiency of your collector array. You'll also need a heat distribution system such as under floor radiant, Again, this isn't hard, doesn't have to be expensive and is certainly within the ability of most of us, but compared to the simplicity of Steps 1 or 1A, there is a lot more to it.
**
How quickly will my solar investment be paid back and how
much am I likely to save?
Depending on how we are using heat, our local utility rates and weather conditions, our payback durations will all be different. That said, we can assume some reasonable averages and calculate the projections as follows:
Let's start with these assumptions:
- The
sun provides 300 BTUs of heating per hour per square foot of collector
-
The average collector is 50% efficient, returning 150 BTUs
per square foot
- The average electricity cost in the US
1n 2009 is 12.05 cents per kilowatt hour (http://www.eia.doe.gov/cneaf/electricity/epm/table5_6_a.html)
-
3.412 BTUs = 1 watt
- The weather conditions average
15 days with 4 hours of sun per month
With those assumptions we can calculate the value of a square foot of collector as follows:
- 720
hours of sun per year X 150 BTUs per hour = 108,000 BTUs per square
foot per year
- 108,000 BTUs / 3.412 watt equivalents =
31,653 watt equivalents per square foot per year
- 31,653
/ 1000 = 31.65 kilowatts per square foot per year
- 31.65
X 12.05 cents = $3.81 per square foot per year saved.
Based on these calculations and assumptions, simply take your total system cost per square foot and divide it by $3.81. If your cost is $4.00 per square foot, your pay back is just over a year. If your cost is $11.50 per square foot, your system will pay itself back in 3 years.
The short payback financial incentives of investing in solar are already compelling, but add in the total lifetime return on the investment and the case is rock solid. Let's add two more assumptions:
- Your
collector will last 35 years
- Energy costs will rise at
6% annually
Based on the assumptions detailed above, the value of the energy generated by your collector is $3.81 per square foot per year based on 2009 energy costs. If energy costs rise 6% next year, the value will be $4.04 and the cumulative total for the two years will be $7.85. Run that same process out 35 years and the cumulative total is $424.57 per square foot!
Based on that value, if you build 100 square feet of collector, your cumulative energy cost reduction over 35 years will be $42,457! Build 200 square feet and you can expect to save $84,914!
Whether you
choose to build a big array or a single small panel, every BTU that
you generate with solar is one less BTU that you have to buy from
your utility company. It's a lot more fun to keep those dollars
in your pocket!
** Can I do something to the windows of my home to transform them into solar collectors?
A window in a house is already a very good solar collector. For our purposes, there's little difference between window glazing and solar collector glazing. It's already collecting about as much sun energy as a collector panel in the same location would collect and it's already delivering that energy right to the house - no need for fans or ducts or pumps or piping.
The window glazing
works the same as the glazing on a solar panel, just as the stuff
inside of your house works just like the absorbers in a panel. Adding
an absorber surface on the inside of a window may even cause more
heat loss since the higher temperatures near the window will increase
the losses through the glass.
** Do you have a link to a web page that will spoon feed the basic construction steps to build and install solar systems?
You bet! You'll find lots of basic information and pictures here on our Solar Construction 101 page:
http://www.n3fjp.com/solar/construction101/construction101.htm
** I live in a sunny but cold weather climate. Will a solar hot air or water system work for me?
Yes! A properly designed collector will work even in temperatures as low or even lower than -30 F. The heat generated from a collector is more a function of time exposed to the sun rather than the outside temperature. If you are in an extremely cold climate, consider building your collector with additional insulation and glazing. We have folks in Alaska and Canada on the SimplySolar group who are getting great results from their home made units.
The colder your
climate, the more use you will get from your space heating system.
Solar can be especially effective during the "shoulder"
winter months, supplying most if not all of your heating needs.
** What kind of paint can I use inside my collector?
I've used the
elcheapo, Quick Color, flat black spray paint, the more expensive
Rustoleum flat black spray paint and I've had Home Depot mix up
a can of exterior flat black paint that I've put on with a roller.
All have worked just fine.
** What's the biggest challenge to installing a solar system?
Each of us have individual solar goals, we each have our own aesthetic tastes, every home is different and we all live in different climates. There are lots of great, easily built "cookie cutter" design options to choose from for solar panels, but the biggest challenge can be making the choice. You'll also have to decide on the size of your panel(s) and how you are going to use the collected heat. It is really easy to get caught up in trying to build the ultimate collector / system and never build anything.
This was so very true for me. There were many times I almost gave in to analysis paralysis in trying to decide what I wanted to do. That, in combination with my misplaced fear that any of this was somehow hard, nearly kept me from some really fun and very worthwhile solar projects.
As you plan your project, when you reach points of indecision that refuse to become clear, flip a coin, ask for opinions or do whatever you do to make your decision and resolve to keep moving forward, even if things still seem a little unclear. It is amazing how everything seems to come into focus when you actually start building your project.
Building solar hot air or hot water systems can be very easy if you choose an easily constructed design option. My hot air collector is simply aluminum downspouts painted black under glazing. My hot water collector is just pex tubing under aluminum fins under glazing.
The sun makes stuff hot. It makes stuff REALLY hot when painted black under glazing. All we are doing is retrieving that heat. If you keep the simplicity of what we are doing in mind, the whole process loses its intimidation.
Keep in mind:
- Anything you build will work infinitely better than nothing!- Many of these designs are very easy to build.
- What you are doing isn't cast in stone. You can always modify your project later (which is part of the fun)
- Keep in mind that a large percentage of your cost and effort will be the frame and glazing, which will remain the same whatever you put inside it. If something doesn't work out, you will just be modifying the internals of the collector, not starting from scratch.
- Don't look at the money you are spending as just an expense. Look at it as purchasing a ticket to have fun with a new hobby. This really is fun!
- This isn't an expensive hobby. Most of us aren't breaking the bank building solar collectors and once they are up and running they will pay us back many times over!
- Relax and enjoy this!
** How
big should my solar panels be?
To answer that, you have to decide on your goal. Do you want to heat a single room, your entire home or a portion of it?
An often cited rule of thumb is that you can have up to 10% of the square feet of the area that you are heating in collector size before it makes sense to start thinking about thermal storage. If you are only going to heat a 10 X 20 room, at 200 square feet of living area you'll need about 20 square feet of collector, or a 4 foot by 5 foot panel for example.
Heating your entire home with solar will require more panels. For a 1,700 square foot home, you can build 170 square feet of collector without the need for thermal storage, or, for example, a 10' X 17' panel array. The great news is that by doing this ourselves, we can build in any dimensions that we like to accommodate our needs as well as the aesthetics of our homes and yards. Square, long and thin or short and fat all work fine!
I should note that the "10% rule" is usually applied to south facing windows. It is likely that you will obtain more heat per square foot from a solar panel than a window, so these example dimensions are probably higher than necessary.
**
Should I start small and build a little panel as a test?
On one hand, every BTU you generate with solar is one less BTU that you will have to pay for, so any size panel is a good panel. That said, many of us got started in solar by building small test panels, realizing solar really works well and enlarging from there. We love experimenting and trying new designs, sometimes with small test panels, but if you are new to solar and want to get started heating your home or hot water in a meaningful way, we recommend that you start with at least a 4 foot by 8 foot panel and design already proven to work well. A 32 square foot panel of those dimensions will be large enough to provide lots of useful heat and it really won't cost much more than building a smaller panel. In addition, you won't spend time on a small panel and then have to start over again on a larger one, doubling your effort and increasing your cost. You'll certainly be pleased with the results!
** How
should my panels be oriented?
There is plenty of sun in the summer, it shines a lot longer and our demand for heat is much less. With that in mind, optimize your panels for winter when you really need the heat. Generally, the closer to south the better and a vertical or near vertical orientation for the low winter sun works best. If your panels are aimed between 11:00 AM and 1:00 PM you'll be nearly perfect. Angles of 10:00 AM and 2:00 PM are fine too, only losing about 10% of the 12:00 PM orientation. If you are striving for perfection, here are some tools that will help:
http://solardat.uoregon.edu/SunChartProgram.php
http://www.builditsolar.com/Tools/RadOnCol/radoncol.htm
That said, there are a wide range of orientations and tilt angles that will work well.
** How important
is it to orient my panels directly south?
When deciding on collector orientation, if the only criteria is sun angle, of course, perfectly south is best. But, in our real world, in addition to sun angle, there are several other considerations that will go into your decision on how best to orient your panel.
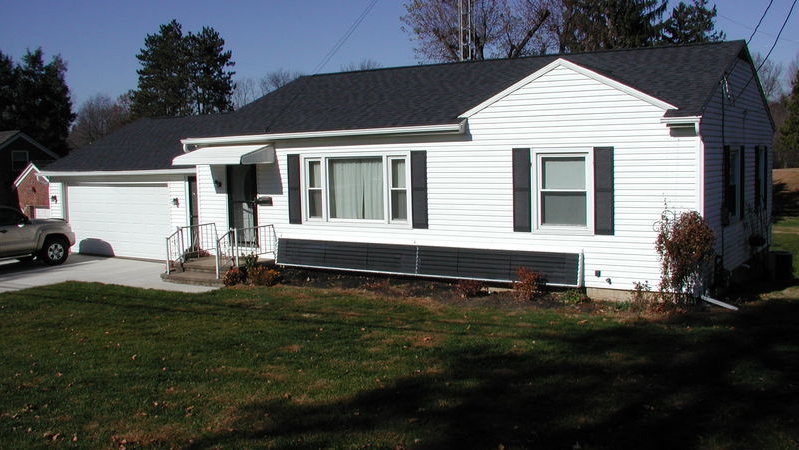
- Odds are, your most southerly wall or roof is not perfectly south, but the very worst case is that your wall is within 45 degrees of south and it's likely much closer to south than that. Using a house wall (or building the collector just in front of your wall) offers several advantages, including nice aesthetics, insulation from the house itself and a really short run to your house.
- You might have shade from a nearby tree or structure in the morning or afternoon, so it makes sense to orient your collector to favor the morning or evening sun as appropriate. That was my case here.
So, how narrow a target do we have before taking a significant performance hit?
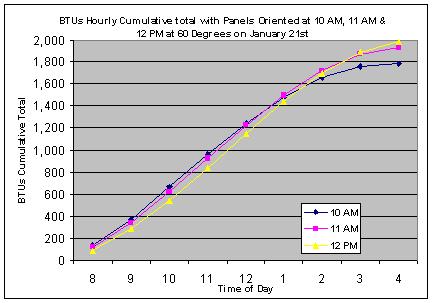
The great news is that we have 30 degree window (15 degrees east or west of south) in which we are within 98% or better of optimum performance! In fact, expand that window to 60 degrees and we are still within 90% or better of optimum!
When I was analyzing collector placement for my 24' X 8' pex collector I used Gary's calculator to determine the results due south (12:00 PM solar noon), 15 degrees off (11:00 AM / 1:00 PM solar) and 30 degrees off (10:00 AM / 2:00 PM solar). This assumes a 60 degree tilt angle to maximize the winter sun.
The target is wide. Don't worry if your collector isn't perfectly south. Any aim capable of hitting the broad side of a barn will serve you well!
** What are some solar collector design options?
You can view many designs here. Check back often as more are being added all the time:
http://groups.yahoo.com/group/SimplySolar/photos/album/0/list
** I
can't put collectors on my house but I do have sun in my yard. Can
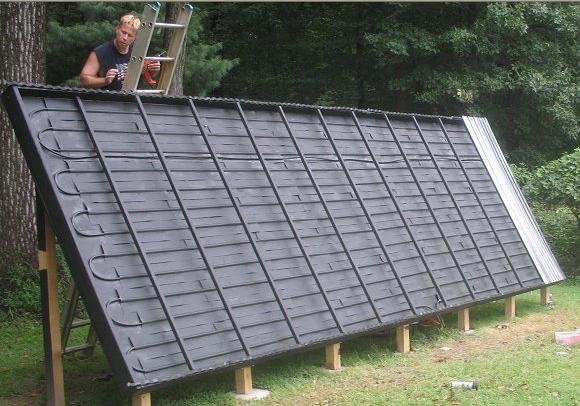
I build the collectors away from my house in the yard?
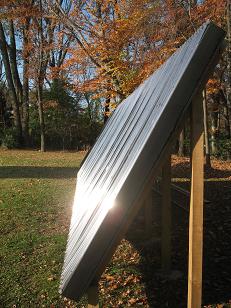
Yes, in fact that opens up options for some very large and efficient collector arrays! I built this 24 foot by 8 foot panel (192 square feet) in my back yard:
http://www.n3fjp.com/solar/BigProject/BigProject.htm
Take a look at this air solar shed:
http://groups.yahoo.com/group/SimplySolar/photos/album/74291004/pic/list
And this water version:
http://www.motherearthnews.com/Do-It-Yourself/2007-12-01/Solar-Heating-Plan-for-Any-Home.aspx
You can also use your creativity to design panels to incorporate into your gardens that will be totally hidden by hedges, etc., from behind.
** I
live in a neighborhood with a community association. Can solar
panels be built in "stealthy ways"?
Yes, this solar collector is only about a foot high and 24 feet long. It sits on the ground, is well hidden and works great!

http://www.n3fjp.com/solar/solarhotair.htm
Also, these days, we really have the wind at out backs for neighborhood acceptance. Everyone is annoyed with their utility bills and Green is in!
If you are planning a solar project, first mention it to your neighbor, but use a little tact. Instead of mentioning your panel plans first thing, when you see your neighbor in the yard, ask him/her if they got their latest utility bill. After you've commiserated together for a few minutes about the cost and high rates, tell your neighbor you've just got to do something about it and work your plans into the conversation. By this point your neighbor might be ready to start on a solar project too! Of course, plan your project so that the end result is attractive as well as functional.
** I'm new to the SimplySolar group and I'm still getting my thoughts together. Do you really want to hear from me?
Absolutely!
There are lots of friendly folks on the SimplySolar
group who are enthusiastic about solar and eager to help. We
enjoy discussing solar projects and that's motivating and inspiring
for everyone! Please share your thoughts and questions with
us. We are eager to meet you!
** Is there a way to store heat for round the clock heating?
Yes, it is called thermal storage. Fortunately, water is clean, cheap, easily circulated and makes excellent thermal storage. Here is a link with great construction details:
http://www.builditsolar.com/Projects/SpaceHeating/SolarShed/Tank/Tank.htm
Here is a list of thermal mass material options, followed by their volumetric heat capacity, (KJ/m³.k):
Water - 4186
Concrete - 2060
Sandstone - 1800
Compressed earth blocks
- 1740
Rammed earth - 1673
FC sheet (compressed) - 1530
Brick - 1360
Earth wall (adobe) - 1300
AAC - 550
** What
are the basic steps for installing a solar system?
1. Decide your objective
A.
Winter Space Heating
B. Domestic
Hot Water Heating
C. Both winter
space heating and domestic hot water heating
2. Choose the location and size of your panel array (the bigger the better)
A.
On your roof
B. Vertically
against a wall
C. Ground mounted
out in your yard
3. Decide whether you want to build an air or water (hydronic) system (lots of criteria to consider in our FAQ file above)
4. Decide on the collector design you would like to build. There are too many to list here, but there are tons of options at www.builditsolar.com. There are collector design options that are very easy to build, require no soldering of copper, etc.
5. If you are building a water based system, decide if you are going to build a thermal storage tank (usually needed for domestic hot water) or simply run the heated water directly from your collector through your under floor radiant or baseboard system and then back out to your collector.
6. Decide how you are going to distribute your heat. With an air system, simply vent it into the rooms you wish to heat. With a water system, under floor radiant systems (which are very easy and inexpensive to install) are most common. Baseboard heating is also an option.
7. Make a list of the materials you will need for your system
8. Order your materials
9. Build your system!
** I
want to be totally independent of the utility company. Is
that possible?
Solar is most cost effective when used along with conventional heating methods as backup. As long as your solar panels are keeping your house warmer than your thermostat setting, your furnace won't run. To be totally independent of the utility company, you have to build panels large enough to provide 100% of your heat on the coldest day of the year, which means the rest of the time they are providing more heat than you really need, so that really isn't the most cost effective approach.
That said, it is definitely possible and an ambitious long term goal! Your system will require more square feet of solar panel and you'll have to add thermal storage for the coldest months. If you are just venturing into solar, we recommend heating during the sunny day as your first goal and letting your utility pick up the nighttime demand. That way you don't have to worry about thermal storage or building a really big panel to start. Additional solar panels are easy to build, so once you have your daytime needs met you can always add on. Here are some things to consider for "round the clock" solar heating:
As mentioned above, a rule of thumb (usually applied to windows) is that you can have up to 10% of the square feet of your home in collector size before employing thermal storage. That means that for a 1,700 square foot home, you can build 170 square feet of collector (a 10 X 17 panel for example) without the need for thermal storage. (The 10% rule is applied to south facing windows and a smaller collector size may be all you need. Please see the "How big should my solar panels be?" question above for more details.) A panel this size should heat your entire home during the daytime hours!
Let's say that you build a 10 X 17 panel and the minimum temperature that you want your home is 68 degrees. With that in mind, you set your conventional thermostat to 68. Assume that during the 4-5 hours of daily January sunshine your system warms your home to 74 degrees. The 6 degree temperature rise (74 - 68 = 6) represents storage. Your walls, floors and furniture all have thermal mass that help store that heat. Depending on how well your home is insulated, it may take a couple hours or more for your home to lose those 6 degrees.
If we assume 4 hours of sunshine in January and that it takes 2 hours for your home to drop back to 68, you are getting 6 hours of solar heating (1/4 of a 24 hour day). After that, your conventional heat will kick back on. That means that in the coldest month, January, you are cutting your bill/demand by 25%!
With longer days and warmer temperatures you'll reduce your bill by more than 25% in November and February, and MUCH more in October, March and April. In fact, in those months, with a reasonably insulated home, you will likely already be supplying nearly 100% of your heat with your existing panel! You will also experience greater savings in January if your home is well insulated and it takes more than two hours to lose those 6 degrees.
Truly going
100% independent is certainly possible, but it is a much bigger
project that has to be designed around January's conditions. As
a VERY rough estimate, for 100% solar heating in January, the solar
panel size should be about four times as big as one designed for
daytime heating. That means for a 1,700 foot square foot home
in January, you'll need roughly 4 times the 10% rule or 680 square
feet of panel and storage. This is a great long term goal,
but start with the daytime heating goal and see how the system works.
That will give you a 25% reduction in the coldest month which
is very meaningful, much more than 25% reduction during the "shoulder
months" and most of the infrastructure will be in place to
add on from there!
** Is there anything I can do to reduce the needed collector size?
Yes, the better
your home is insulated, the less demand you'll place on any heating
system. In some cases it is easier to enhance your home's
insulation. It other cases it is easier to build more panels.
You can decide that based on your individual circumstances.
** How do I get the blower fan (or water pump for liquid systems) to turn on and off automatically?
Here are two options:
A snap disk fan switch like these for $6.50:
https://www.pexsupply.com/pex/control/search?SEARCH_STRING=snap+disc
Advantage: Cheap!
Disadvantage: You have to run electricity out to your collector
Or
A differential sensor like this one for $143.20 (plus the cost of two sensors):
http://kingsolar.com/catalog/mfg/heliotrope/dtt94.html
Advantage: Plug and play - just plug your blower fan or pump into the unit. You only have to run a small gauge wire such a speaker wire out to the sensor on your collector.
Disadvantage: Costs $134.70 more than the snap disk fan switch.
** How
can I measure the performance of my panels?
The sun strikes a properly oriented panel at about 300 BTUs per hour per square foot. A collector running at 100% efficiency would provide all that heat, but 100% isn't possible because some light is reflected back, heat is lost through the glazing and walls of the collector, etc. A collector running at 50% efficiency is generally considered good. It is easy to calculate the efficiency of your panels using these Excel spreadsheets:
Air: http://www.n3fjp.com/solar/HotAirEfficiencyCalculator.xls
Water: http://www.n3fjp.com/solar/HotWaterEfficiencyCalculator.xls
** Do you have an Excel spreadsheet to help design a thermal storage tank:
Yes, this spreadsheet will give you the volume, weight, thermal storage capacity and other useful information for any given set of dimensions:
http://www.n3fjp.com/solar/tank.xls
** "What is the optimum air flow through an air collector?
A good target is approximately 2.5 to 3 cubic feet per minute per square foot of collector.
The output of a solar collector is the temperature rise multiplied by the amount of air flow or volume (cubic feet per minute (CFM) of air flow). Let's say collector A raises the temperature 30 degrees at 160 CFM and collector B raises the temperature 60 degrees at 80 CFM. The air becomes warmer in collector B because it is moving slower and spends more time in the collector. The air in collector B is warmed twice as much as A, but it is moving half as fast, so both collectors wind up with the same output. In that sense, air flow isn't critical.
Where air flow does come into play is with overall collector efficiency. The hotter a collector becomes, the more heat you will lose because of radiation through the glazing, sides and back of the collector, as well as any ducting. The higher the air flow, the cooler and more efficient your collector will be, which will make it more efficient and return more heat to your home.
There may also be a point where you have so much airflow that the output becomes uncomfortably cool. Our forced hot air, natural gas heat puts out about 120 degree air at the vents, which is plenty warm. We used to have a heat pump at a previous residence that put out air somewhere in the 80s. It warmed the house fine, but the cooler moving air wasn't as comfortable. It is a subjective answer, but I think an optimum output is somewhere around 100 degrees - cool enough for an efficient collector and warm enough to feel good when you walk past the output.
You can use this Excel spreadsheet to estimate the air flow for your system.
http://www.n3fjp.com/solar/HotAirEfficiencyCalculator.xls
1. Enter your collector dimensions
2. Enter your expected input temperature
3. Enter your desired output temperature (I use 100 degrees)
4. If you know your collector's efficiency, change the air flow volume values until you approach your efficiency target. If you don't know your collector's efficiency, 50% is a reasonable assumption.
The cubic feet per minute of air volume that gets you to your efficiency target is your optimum air flow.
Keep in mind that when you order your blower, you'll want to size it larger than this number. Air flow decreases significantly as it moves through the turns in your collector and ducting.
** How
can I measure the actual air flow through my system?
An anemometer will give you the most accurate results, but here is an inexpensive method that will give you a reasonable estimate of the cubic feet per minute (CFM). This spreadsheet will do all the calculations below for you: http://www.n3fjp.com/solar/AirflowBagTestCalculator.xls:
1. Get the largest trash bag that you can (we will assume 30 gallons for this exercise)
2. Quickly put the bag over the outlet of your system and time how long it takes to fill it
3. Divide the gallons by 7.48. There are 7.48 gallons per cubic foot, so a 30 gallon trash bag would hold 4 cubic feet of air volume (30 / 7.48 = 4)
4. Divide 60 seconds by the number of seconds it took to fill the bag and then multiply by the volume
If it takes 3 seconds to fill our 30 gallon bag, the air flow is calculated as follows:
60 seconds /
3 seconds to fill X 4 cubic feet of air volume = 80 cubic feet per
minute
**
I want to measure my airflow with an anemometer. How
do I convert my anemometer reading to cubic feet per minute (CFM):
Most anemometers read airflow in miles per hour (MPH) or feet per minute (FPM). An anemometer won't give you cubic feet per minute, as that varies based on duct size. Here is how you can convert linear feet per minute (or MPH X 5,280 / 60 to convert MPH to FPM) for any round duct size to cubic feet per minute (CFM), We will use a 6" round duct as an example.
1. Go here to determine the volume of a cylinder:
http://www.online-calculators.co.uk/volumetric/cylindervolume.php
2. Enter the radius (1/2 the diameter) in the radius field. For our 6" diameter example, 3". Enter 12" in the height field (since we want to know the volume in one linear foot of the duct). Select inches for unit of measure and then click calculate. We discover 339.43 cubic inches are in every linear foot of duct.
3. Determine what portion of a cubic foot is in one linear foot of round duct. A cubic foot is 12" X 12" X 12" = 1,728 cubic inches. 339.43 / 1,728 = .196. That means, it takes just over five linear feet of round, 6" duct to equal one cubic foot of air.
4. To convert the feet per minute reading you are getting from your anemometer to cubic feet per minute, just take the FPM reading and multiply it times .196.
For example, if you are reading 430 FPM, 430 X .196 = 84 CFM.
** Is
it better to set up the fan so that it pushes air into my hot air
collector or pulls the air through my collector?
The main reason that it is better to pull the air is because, in layman's terms, if you push, the air "smashes into" all the elbows and other obstacles, reducing airflow. Pulling does not cause this effect. (HVAC engineer talking here.) The main reason you would choose to push the air is so that your fan is at the cool end of the air stream. Depending on the fan's specs, it may last longer. Either option will work well.
** What
is the optimum flow of water or glycol through a liquid (hydronic)
collector?
As an aside, parallel flow collectors usually have less flow resistance than serpentine collectors. My run out to my serpentine collector and back is about 300 feet, plus another 300 feet in the collector, plus about 100 feet of heat exchange coil in the tank. As a result, my flow rate is way low at only about a gallon per minute. Still, I'm collecting plenty of heat.
** What's the difference
between parallel flow collectors and serpentine collectors?
In a serpentine collector, the fluid follows a single path, snaking back and forth through the collector. Here is an example of a serpentine collector:
In a parallel flow collector, the fluid has multiple tubes to travel through:

The main advantages of parallel flow are better drain back and less flow resistance. The advantage of serpentine flow may be ease of construction and the opportunity to use materials such as PEX. Both parallel and serpentine flow designs will capture about the same amount of heat.
** How do I keep the water from freezing in my panels in the winter?
The most common ways of dealing with freeze protection in hydronic systems are using a glycol/water mixture, building a system where all the water drains back when the pump shuts off or keeping the panel warm in some way. Of course, this is not an issue with hot air collectors.
Here is a brief summary of the advantages and disadvantages of each option:
Drain back (fluid drains back to your thermal storage tank when the pump shuts off)
Advantages:
- Don't
need glycol
- Don't need a coil in the thermal storage
tank as water can be pulled directly from the tank
- More
efficient heat transfer without the need for a coil
- No
need for an expansion tank or other method to offset any pressure
build up
Disadvantages:
- The
main disadvantage is a big one - you have to carefully design the
system so that all the fluid drains back. That means the collector
has to be higher than the tank and all the outdoor runs to the collector
must slope up. In addition, all the pipes inside the collector
must slope as well.
- A strong enough pump (a pump with
a high head) is required to lift the fluid up to the collector.
Glycol/Water mixture (fluid is always in collector)
Advantages:
- You
can place the collector anywhere you like.
- You can design
a serpentine collector without worrying about sloping the pipes
-
You don't need as strong a pump (as high a head pressure)
Disadvantages:
- Need
glycol
- Need a coil in the thermal storage tank
- Less
efficient heat transfer with the need for a coil (though a decent
sized coil works fine)
- Need for an expansion tank or
other method to offset any pressure build up (not hard or expensive,
but something to keep in mind. I'm just using a small open
reservoir (old iced tea jar))
Heating the panel with an energy source:
This is usually done by turning your pump on to circulate the warmer water from your thermal storage tank through the panel when temperatures are nearing freezing.
The disadvantages here are:
- Your
system is consuming energy or the heat you collected to warm itself.
-
If there was ever a systems failure or power outage, you may
be done until spring.
I've used both a drain back system with serpentine copper collectors as well as glycol in my PEX collector. When I first got into this, doing a glycol system struck me as being harder and more complicated. It's really not any harder, and having the freedom to put the collector where ever I wanted (In my case more than 100' from the house) made it an easy decision.
** Solar
heat is such a great alternative and an important step that we should
all take. Why don't I see more advertisements for solar? (Actually,
I don't think this question has ever been asked. but it is important
to consider).
Even though solar is a great project, you aren't going to see much in the way of advertising to encourage you to do it. Keep in mind, there has to be an economic incentive for companies to buy advertising. With the exception of solar companies who generally don't have the critical mass to be able to afford large scale advertising campaigns, there isn't a reason for anyone to pay for solar ads. In fact, every solar panel you build takes money out of the Utility company's pocket.
In addition, adding solar to your home with basic building supplies can be done much less expensively by you. I understand that in many cases the shipping costs alone for a premanufactured collector approach the entire cost of a home made collector.
Going with an
established solar company is a fine option if you don't have the
time or inclination to build your own, but adding solar is truly
a very worthwhile project that most folks can do themselves.
** Do you have links to order the parts that aren't available locally?
You bet:
22 Gage Wire
for Remote Sensors
http://www.gigaweb.com/products/view/1282/1000-22-gauge-2-conductor-speaker-wire.html
8" Aluminum
Flashing
http://www.amazon.com/Amerimax-66008-Aluminum-Versa-Flashing/dp/B000DZBFVA/ref=sr_1_6?ie=UTF8&s=hi&qid=1254614675&sr=8-6
Differential
Controller
http://www.altestore.com/store/Solar-Water-Heaters/Differential-Temperature-Controllers/Delta-T-AC-DTC-Corded-w-Plug/p6837/
Fantec Fan
http://www.radon.biz/fantechhp2190replacesthebulkyoldstylehp190.aspx
Glycol: Cryo-Tek
http://kscdirect.com/item/HER+35281/HERCULES+CHEMICAL+CO.%252CINC_1GL+CRYO-TEK+-100+ANIT+FREEZE%250A
Pex-Al-Pex
http://www.pexsupply.com/Mr-PEX-814-1-2-PEX-AL-PEX-Tubing-300-ft-coil-3843000-p
Pipe Insulation
https://www.pexsupply.com/Thermacel-Pipe-Insulation-812000
Pumps
http://www.pexsupply.com/Taco-Cast-Iron-Pumps-289000
Sharkbite Fittings
https://www.pexsupply.com/SharkBite-Fittings-595000
Snap Switch
Disk Thermal On Off Controls
https://www.pexsupply.com/pex/control/search?SEARCH_STRING=snap+disc
Suntuf Glazing
http://www.homedepot.com/h_d1/N-5yc1vZ1xh7/R-100021329/h_d2/ProductDisplay?langId=-1&storeId=10051&catalogId=10053
Thermal Storage
Tank - How to Build One!
http://www.builditsolar.com/Projects/SpaceHeating/SolarShed/Tank/Tank.htm
There are lots
more links here:
http://tech.groups.yahoo.com/group/SimplySolar/links
SimplySolar - Solar
Forum and E-mail Groups!
I originally set up an e-mail group - SimplySolar, for that purpose. The e-mail group has served us well, but with overwhelming growth and interest in the e-mail group, to better keep content organized and give members the option to easily follow only the threads that interest them, we have just set up a new Simply Solar on line forum! SimplySolar is about brainstorming and sharing ways to implement solar heat in easy ways that the average homeowner, who may not be much of a "do-it-yourselfer" (like me), can use to put money back in their pockets, green back in the environment and have a lot of fun along the way! If solar excites you, we would love to have you join our forum:
Click to visit or join the Simply Solar Forum
or subscribe to our e-mail group!
Thanks again for your interest in solar!
Sincerely,
Scott Davis
![]()