
Digital Setup Quick Steps
Introduction
The following are the essential steps for interfacing some of the popular digital software directly with my programs via API. It is written with both my contesting software and Amateur Contact Log in mind, for versions released after August 2016 (AC Log 5.7 and later).
This page is intended as a very basic, quick start guide. These programs are written by other authors and have their own support groups. Most authors have more detailed help documentation for interfacing with my programs, so please read their help files for complete details.
I am not an expert on these programs and I am not in a position to provide support for other folk's software. If you need help using, programming macros, setting sound card levels and other functionality of the respective programs, please consult the digital author's documentation or post to their users support group.
Configuring N3FJP Software:
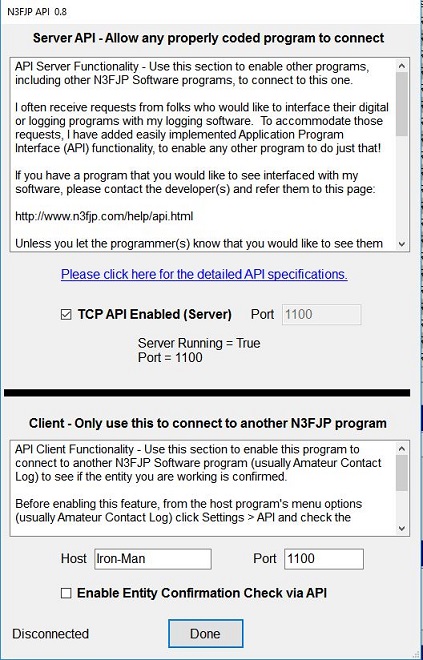
Regardless of which digital program you plan to use, the first step will always be to start the N3FJP Software program you want to connect to before starting the connecting program. N3FJP must be running to listen for the command to log the QSO. From N3FJP Software's menu options click Settings > Application Program Interface and check the upper check box that says TCP API Enabled (Server). Leave the lower check box unchecked. The API setup form should look like this:
For rig control, when interfacing another application with our software, since Windows won't allow port sharing among programs, you have three options for rig interface:
1. Use the connected program to perform rig interface. In that case, from the N3FJP program menu options click Settings > Rig Interface and select None from the rig list.
2. Use rig interface from N3FJP software and disabled rig interface from the connected program. If your rig is set to USB for digital, to only have N3FJP Software respond to mode updates sent from the connected program, click Settings > Rig Interface. Under the Mode By options, select Mode by Frequency (to return the digital mode based on frequency) or Don't Use (if the connected program is accurately returning mode). Also, if you will be clicking on DX Spots to change frequencies in the digital subband, check the check box that says "Don't send mode change with frequency".
3. Use a virtual com port splitter. We've not beta tested this option here, but there have been good reports from others on the Users group.
Personally, I typically run WSJT-X with AC Log and N7YG Digital Engine in RTTY contests with N3FJP Software doing the rig interface. It is very easy to configure, since it eliminates all rig interface configuration in the connecting program. Just be sure that you check the option in Digital Engine to have N3FJP handle TX RX.
Those are the only steps required in N3FJP Software. Everything else is handled by the connecting program. Connecting programs documented on this page include Digital Engine, Fldigi, GridTracker, JT Alert, PSK Express, W4ELP Lookup, WSJT-X and WSJT-X to N3FJP by W3DJS.
Digital Engine by Jeff, N7YG
Download Link: https://n7yg.net/software/n7yg-digital-engine
User's Guide: https://n7yg.net/pskexpress/N7YG%20Digital%20Engine%20Users%20Guide.pdf
Support: https://groups.io/g/pskexpress
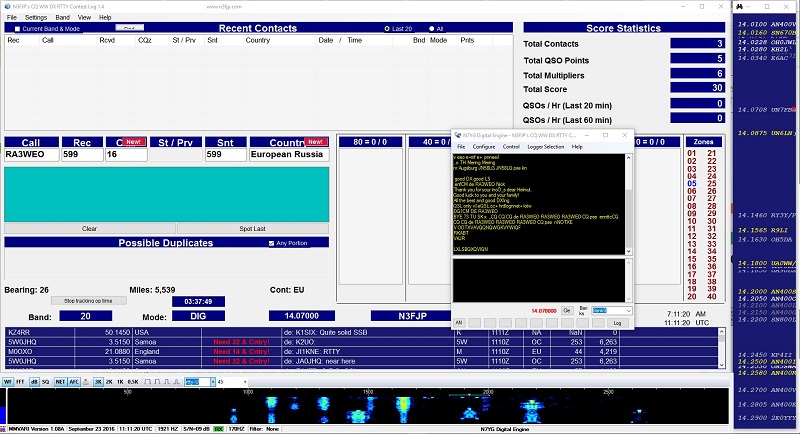
Comments: Probably the easiest to configure, this program was specifically designed by N7YG to function as a companion to the suite of N3FJP software. It provides a simple digital interface with a floating waterfall, so you can configure Digital Engine in a variety of ways that require very little screen space. The Digital Engine detects which N3FJP program it is connected to and configures automatically.
Note that the waterfall is a little tricky to move. Sometimes it continues to follow your mouse after you stop dragging. Just click again to disconnect.
Setup:
- From the menu options in Digital Engine click Logger Selection and select N3FJP. The name of the N3FJP Software program you are connected to will appear in the title bar and frequency will appear below if you have rig interface enabled.
- Configure macros, or press Ctrl T to transmit and Ctrl R to receive.
- For RTTY contests, Select RTTY from the waterfall
- Can be customized to fit on one screen
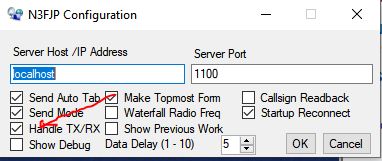
- Tip: It is not necessary to enable rig interface settings at all in Digital Engine. To key your rig during transmit, with N3FJP Software set up for rig interface, just click Configure > N3FJP and check the check box labeled Handle TX / RX.
To send a value to N3FJP Software:
- Left click the text in the decode window and select the field
- Click Log contact to log.
Here is a video segment that Dan, K3TEF kindly put together that details how easy it is to interface N7YG Digital Engine with N3FJP Software:
Typical logging sequence for CQ WW RTTY:
A. Left click on a Call in the decode window and click send to call sign. Default CQ zone and RST values appear immediately in CQ WW RTTY.
B. If working a US or Canada station, left click on the State / Province and click send to State / Province.
C. Click Log Contact
Fldigi by Dave, W1HKJ

Download Link: https://sourceforge.net/projects/fldigi/files/fldigi/
User's Guide: https://sourceforge.net/projects/fldigi/files/fldigi/fldigi-help.pdf/download (Interfacing with N3FJP Software begins on page 135).
Support: https://groups.io/g/winfldigi/
Comments: Fldigi is excellent, widely used digital software that supports many digital modes.
Note that while some applications send each field value to N3FJP as you select them from the decode window, Fldigi only sends the call in advance, so don't expect to immediately see the other exchange values in N3FJP Software. When you click Fldigi's Save button, the rest of the fields in N3FJP Software will fill and save.
Setup: (these are the very basics. Dave has LOTS more documentation in his Users Guide)
- Click Configure > N3FJP Logs
- Unless you are connecting to a different PC, just leave the defaults and click Connect as shown.

- Tip: It is not necessary to enable rig interface settings at all in Fldigi. To key your rig during transmit, with N3FJP Software set up and connected to your rig for rig control, click Configure > Rig Control and make sure the option to use Flrig is NOT checked. Also click Configure > Contest Logs > N3FJP and make sure that PTT via <RIGTX> and <RIGRX> is checked.
- If you are going to operate a contest, click Configure > Contest and select the contest, such as CQ WW RTTY or Generic for ARRL RTTY.
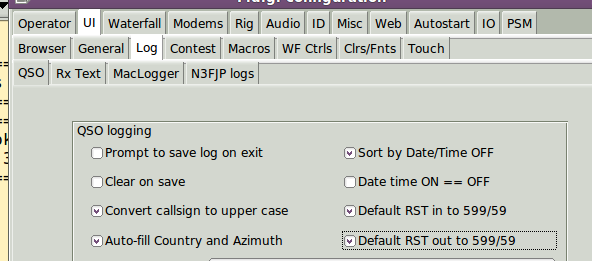
- Click Configure > UI > Log > QSO and enable the RST defaults (check the box that says "RST always 599/59"). That way you won't have to take the time to capture the RST values during the QSO.
- Click Op Mode > RTTY to set up for CQ WW RTTY
- Configure macros.
To send a value from Fldigi to N3FJP Software:
- Right click the value in the decode window and then select the field. Only the Call field is sent immediately. The rest are held in Fldigi's queue and displayed in Fldigi until save is clicked.
- Clicking the Save button (button with blue down arrow) will write the values to N3FJP and save the contact.
Typical logging sequence for CQ WW RTTY:
A. Right click on a Call in the decode window and click call.
B. Right click on the CQ zone and click CQ Zone.
C. If working a US or Canada station, Right click on the State / Province and click CQ State.
D. Click button with the blue down arrow to log the contact
E. Then click the yellow brush in Fldigi to clear the existing values in the Fldigi software.
GridTracker by Tag, N0TTL
Download Link: https://gridtracker.org/index.php/downloads/gridtracker-downloads
Support: https://groups.io/g/GridTrackerApp
Comments: Digital bridge software from WSJT and others to N3FJP with sophisticated mapping features.
JTAlertX by Laurie, VK3AMA
Download Link: http://hamapps.com/
Support: https://hamapps.groups.io/g/Support
Comments: Digital bridge software emphasizing FT4, FT8, JT and other digital modes.
Setup:
- From the menu options in JTAlert click Settings > Scan Log and Update.
- Click the plus by Logging.
- Select AC Log.
- Click the check box for Enable AC Log Logging.
When you log the contact in the connected program, it will also log in AC Log.
In addition to Amateur Contact Log, with JTAlert 2.12.10 and later, Laurie has added contest program support too!
Laurie (JT Alert developer) writes:
Major new feature is the support for logging WSJT-X 2.0.0 contest QSOs (RTTY Roundup, NA VHF & Field Day contests only) to N3FJP Contest loggers. See the JTAlert Help file, "Tutorials -> N3FJP Contest Logs Logging" topic.
Please note that you must log the QSO in WSJT-X and it will be forwarded to Contest Log and the correct exchange will be logged (with WSJT-X set up for contesting and the entire, correct exchange received in WSJT-X).
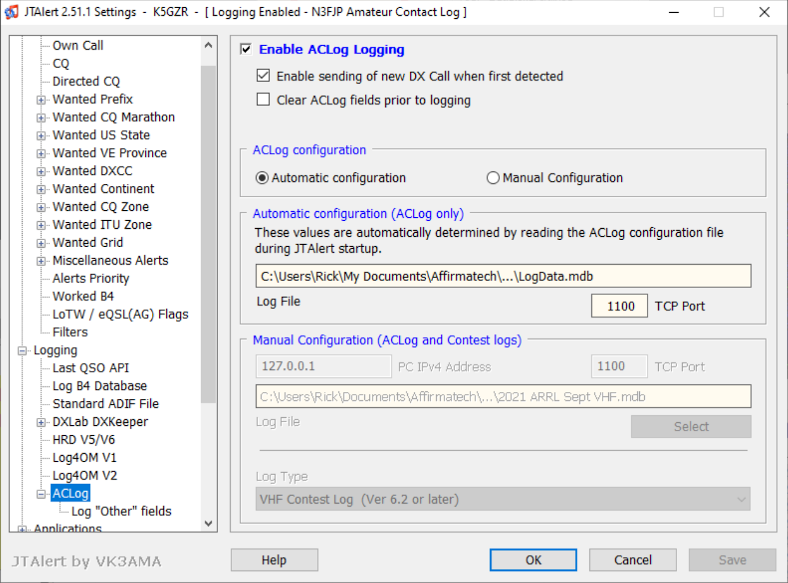
JT Alert will work with our contest software including Field Day contest log, ARRL RTTY RU, VHF contest log, etc., just like AC Log, but JT Alert is set up to default to AC Log. If you just use the defaults, JT Alert will not be able to verify the QSO was added and present a warning. To remedy that, Laurie, VK3AMA (the JT Alert author) writes:
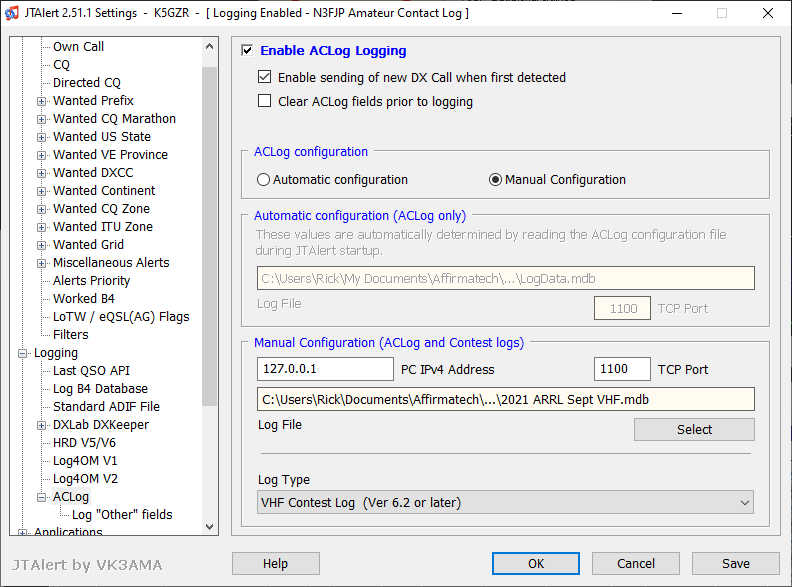
JTAlert setup for ACLog is designed to require no setup by the user (except for enabling ACLog logging) with JTAlert automatically determining the correct API port and log file location by reading the ACLog config file. This automatic setup can be bypassed, allowing for manual selection of an N3FJP contest program log file by [Manual Configuration] option in the JTAlert settings and selecting the N3FJP contest log file [click File > Show File Locations in the contest software to see the path]. This will allow JTAlert to verify QSOs and perform accurate B4 checks against the N3FJP contest log file.
JTAlert supports [these contest programs], but you can't just substitute ACLog with FDLog, it will never work. There are WSJT-X, FDLog & JTAlert settings that need to be configured. Setup is not difficult and easily done, but without reading the specific Help Topic on this, I can guarantee your failure.
See the "Tutorials -> N3FJP Contest Logs Logging" topic in the JTAlert Help file.
de Laurie VK3AMA
Here is an example contest configuration:
When you log the contact from the connected program, if JTAlertX consistently reports that it can not confirm the QSO was logged, correct your settings as detailed above, so that the log file you are currently using is selected.
If the warning only appears occasionally, increase the Check QSO Log Record time in JTAlert's settings as detailed here:

PSK Express by Jeff, N7YG
Download Link: https://n7yg.net/software/psk-express
Support: https://groups.io/g/pskexpress
Comments: A full featured digital program that supports a variety of digital modes including RTTY. Like the Digital Engine, PSK Express detects which N3FJP program it is connected to and configures automatically. Also note that while Digital Engine uses Left clicks, PSK Express uses Right clicks.
Note that with regards to interfacing with my software, PSK Express and Digital Engine function very similarly, but PSK Express can't be sized down as much as the Digital Engine and the waterfall isn't a separate window. If you only have one monitor, the Digital Engine may be the better choice.
Setup:
- From the menu options click N3FJP > Setup > Enable Interface. If successful, the name of the program and current frequency will display on the main form.
- Configure macros, or press F4 to transmit and F5 to receive.
- For CQ WW RTTY, Select RTTY from the Mode drop down (under the Windows menu option near the top)
- Tip: It is not necessary to enable rig interface settings at all in PSK Express. To key your rig during transmit, with N3FJP Software set up for rig interface, just click N3FJP > Setup and check the check box labeled Software TX / RX.

To send a value to N3FJP Software:
- Right click the text in the decode window and select the field
- Click Log contact to log.
Typical logging sequence for CQ WW RTTY:
A. Right click on a Call in the decode window and click send to call sign. Default CQ zone and RST values appear immediately in CQ WW RTTY.
B. If working a US or Canada station, right click on the State / Province and click send to State / Province.
C. Click Log Contact
W4ELP Lookup Bridge program by Ed, W4ELP for Ham Radio Deluxe / DM780
Download Link: (Files section) Download Link: https://groups.io/g/W4ELP/
User's Guide (Documentation section): https://groups.io/g/W4ELP/
Support: https://groups.io/g/W4ELP/
Comments: The program, W4ELP Lookup, started as a set of keyboard shortcuts to make DM780 more contest-friendly. The “bridge” to make DM780 work with N3FJP loggers was added in response to user requests.
The program works by continuously “reading” values in DM780 and copying them to N3FJP. When a contact is logged in DM780, it is also automatically logged in N3FJP. This is fully automatic, with all operator interaction taking place in DM780. Although designed for DM780, many functions work with HRD Logbook’s entry form as well. HRD Logbook remains fully functional.
Setup:
Download and install W4ELP Lookup. A setup screen appears on first use where the station call, lookup passwords and other information can be entered. Full user manual and documentation are included.
When any N3FJP logger is started, the program automatically goes into N3FJP mode. If the logger has not been used before, the program will do a brief “learning” routine to determine what fields are in the N3FJP logger and their order. This tells the program where to put callsign, name, band, etc. The information is saved to a file for use in future startups.
To send a value to N3FJP Software:
- Just enter it normally in DM780, by typing into the DM780 field or right-click a call in the RX screen. Information is immediately copied to N3FJP for all fields. To force a copy, hit the ALT key.
Typical logging sequence for CQ WW RTTY or any N3FJP logger:
A. Call sign - Right-click a call or type it into DM780 and hit TAB.
B. Contest Exchange – With a call already in the DM780 box, right-click the exchange in RX window or type it into the RCV EXCH box on DM780. For multi-part exchanges, right-click each part separately or type in with a space between each part. Example: 05 GA. The program automatically puts each part in the corresponding field in N3FJP.
C. Hit Numpad ENTER or F7 to log contact in both HRD and N3FJP. DM780’s
WSJT-X
Download Link: https://sourceforge.net/projects/wsjt/
User's Guide (Documentation section): https://physics.princeton.edu/pulsar/k1jt/wsjtx.html
Support: https://groups.io/g/WSJTX
Comments: You can still use an intermediary program like JTAlert or Grid Tracker to connect WSJT-X to Amateur Contact Log and the contest software if you like, but now you have the ability to connect WSJT-X directly to N3FJP software! To do so:
Setup:
From N3FJP Software's menu options, click Setting > Application Program Interface and select the option to Listen for WSJT-X. With WSJT-X set to its default settings, typically you simply have to enable this check box here:

If you have everything configured correctly and WSJT-X running, Sec Elapsed should reset every few seconds.
If more than about 20 seconds have passed without resetting, your settings are incorrect and the programs aren't communicating. If so, click Configure.
On the form that appears, clicking Auto Detect in most cases corrects your settings:

This form also allows you to select a different port and customize the colors that appear in WSJT-X, but that typically isn't necessary to get you started. The other API options in AC Log aren't relevant for directly connecting to WSJT-X.
On WSJT-X's reporting tab, make sure that you enable the option to Accept UDP requests to see the colors. My settings look like this:

As calls are decoded, your log is checked for the call and entity status. In AC Log, needed entity status (new, new on band, new on mode or new on band and mode) is based on your selection in Settings > New Contact & QSL Alert Options. The colors that you see are determined as follows, in this priority:
Black - AC Log Watch List call (white forecolor when unworked and yellow forecolor when worked)
Red - Duplicate call on Band and Mode (will be very handy in the contest software)
Green - Unconfirmed Country
Blue - Unconfirmed State
Purple - Unconfirmed Grid
No color - the call has not been worked, but the country, state and grid are all confirmed.
Here is an example:

We've heard from our beta testers that JTDX works well too, though we understand the JTDX developers have not yet enabled the colors we send to appear, so you won't see the neat coloring if you choose the JTDX app.
For rig interface between WSJT-X and N3FJP software, since only one program can connect directly to your rig, you can either let Amateur Contact Log or WSJT-X perform rig interface. We strongly recommend letting AC Log (or the contest software) perform rig interface, as that is easiest to set up and works great.
If you do want WSJT-X to perform rig control, from N3FJP Software's menu options click Settings > Rig Interface and select None from the rig list (be sure to click the Save Settings button below the rig list first to save your working settings). Then configure rig interface in WSJT accordingly.
To let N3FJP Software perform rig interface as recommended, just set WSJT-X's rig selection to None. That's my preference here, as I can quickly switch to SSB or CW and then back to FT8 without having to reconfigure rig interface in either program and it eliminates rig interface port sharing conflicts. Please note that if you go this route, it is best to set AC Log to return Mode by Frequency and enable All Mapped Digital Modes. Otherwise, AC Log will display SSB for mode until you log a contact, but the mode will be saved as the proper digital mode either way.

Our software will set most rigs to transmit as WSJT-X transmits, so WSJT-X remains fully functional with N3FJP Software performing rig control.
When interfacing WSJT-X with our contest software, if the exchange is not the standard FT exchange, make sure you have selected the correct contest exchange in WSJT-X. In WSJT-X click File > Settings > Advanced, check Special Operating Activity and choose the correct contest (Field Day, WW Digi, NA VHF, RTTY RU, etc.).

If you wish to have AC Log and other programs such as JTAlert or GridTracker to all connect directly to WSJT-X, so you can benefit from AC Log's coloring feature, as well as the great information these other apps display, you can configure the apps for multicasting as detailed here.
WSJT-X to N3FJP by Dave Slotter, W3DJS

Download Link: https://github.com/dslotter/wsjtx_to_n3fjp
User's Guide: https://github.com/dslotter/wsjtx_to_n3fjp/blob/master/README.md
Support: https://github.com/dslotter/wsjtx_to_n3fjp/issues
Comments: WSJT-X to N3FJP is a Python application which serves as a conduit for Linux users of WSJT-X (who don't have JTAlert) to serve as an intermediary to log to N3FJP logging software.
Setup:
Follow the directions in the README at: https://github.com/dslotter/wsjtx_to_n3fjp/blob/master/README.md
Many thanks to Tom, N4FWD, for this tutorial that fleshes out additional details, that you will find here.
Conclusion
As you can see, even covering just the most basic functions in the briefest way possible covers a lot of ground, so I really encourage you to read each developer's documentation, join their e-mail groups and seek support there as needed.
We have been working really hard the last few months on the interface features of our respective programs. There is a lot going on under the hood and we all realize that there are likely lots of opportunities for improvement that will come to light. We welcome your feedback and suggestions on the developer's respective e-mail groups!
![]()
Copyright 1997-2026, N3FJP Software - Affirmatech, Inc