
Application Program Interface (API)
Version 2.2
We often receive requests from folks who would like to interface their digital or logging programs with our logging software, so we've added easily implemented Application Program Interface (API) functionality in all our logging programs, to enable any other application to do just that!
As other software developers add this API in their software so that they can connect to N3FJP Software, the value and power of this feature will become increasingly evident. The programs that interface with N3FJP Software so far are listed here.
If you have a program that you would like to see interfaced with our software, please contact the developer and refer them to this page (http://www.n3fjp.com/help/api.html)! Developers often add upgrades based on feature requests from their users. It may be your prompting that makes the difference!
Developers, you can work with any of the programs you are interested in by installing them from their respective download pages. Here are a few direct download links to some of the programs you may be most interested in:
 Download Amateur Contact Log Now!
Download ARRL Field Day Contest Log Now!
Download NAQP Contest Log Now!
Download ARRL RTTY Roundup Contest Log Now!
Download CQ WW RTTY Contest Log Now!
Download CQ WPX Contest Log Now!
From our software's menu options click Settings > Application Program Interface and check the TCP API Enabled check box on the top half of the form. That's all you have to do with our software. The rest is handled by the connecting program as detailed below.
From the standpoint of the API, with a few tiny AC Log exceptions, all our programs are virtually identical, so once you have coded for one of our programs, your API connection to our software can be used in over 100 programs in the N3FJP Software suite!
Specifications
Connection
Connection is by TCP. Our logging program is the server. The default port is 1100, but any port can be specified.
Once connected, your program can send commands and data to N3FJP Software, QSO records can be saved to the log file by N3FJP Software and data can be queried from N3FJP Software, all as your program instructs. Your program can be fully interactive with N3FJP software, behaving just as a physical user would, entering data in text boxes and logging QSOs, or just passively monitor the N3FJP Software activity. It's your choice, depending on which API features you wish to implement, how you want your program to interact with N3FJP software and your creativity!
Use a CR + LF character at the end of your text to indicate the end of a transmission (\r\n in C#).
Terminate the connection by sending a single CR + LF character without any other text (\r\n in C#), or just close your program to disconnect.
If you've never coded a TCP client connection before, I have additional resources to make that easy here.
Format
All commands and responses are upper case and are encased by <CMD></CMD> tags. The first value after <CMD> is the command or response identification. Any additional values follow, which are encased in XML tags. The basic format is:
<CMD><Command or Response ID><XML tags for additional command / response parameters>values</Closing XML tags></CMD>
Please take a look at the examples that follow and I think you'll quickly get the idea.
Text Entry Boxes
To write data to a text entry box (or clear it by sending the command with no data), use the following format, where CONTROL is the name of the text box (a complete list of available text entry boxes is below). New in 0.6.2, you can also write to and optionally receive text change events for the lblDialogue label.
<CMD><UPDATE><CONTROL>TXTENTRYCALL</CONTROL><VALUE>KA3SEQ</VALUE></CMD>
I really recommend sending the CALLTAB action command immediately after sending a call sign to the call sign field (unless you are going to immediately send the ENTER command), as it initiates a number of actions, including optionally listing that specific call if it has been worked on other bands, a check of the history file (if enabled), dupe check, Callbook Lookup (in AC Log), etc. Please see the Action Command section below for more details. Call the CALLTAB command like this:
<CMD><UPDATE><CONTROL>TXTENTRYCALL</CONTROL><VALUE>W1AW</VALUE></CMD>
<CMD><ACTION><VALUE>CALLTAB</VALUE></CMD>
To read a value from a text entry box, send the following:
<CMD><READ><CONTROL>TXTENTRYCALL</CONTROL></CMD>
N3FJP Software responds:
<CMD><READRESPONSE><CONTROL>TXTENTRYCALL</CONTROL><VALUE>W1AW</VALUE></CMD>
To set the focus to a specific text box:
<CMD><FOCUS><CONTROL>TXTENTRYCALL</CONTROL></CMD>
Note, while you can write values to the band and mode fields as detailed above, this isn't the recommended way to change bands and modes. That method will only work in AC Log if rig interface is disabled and it will not work in the contesting software at all.
Instead, to ensure the proper band and mode are logged, if the user has N3FJP Software set to a different band or mode than the QSO you are about to log, you must first change the software to the new band or mode before using the Action ENTER command to log the contact. Please see the Changing Band, Mode and Frequency section below for details.
Action Commands
The following action commands call various functions in N3FJP Software. After you send an Action command, please wait at least five milliseconds before sending another command:
ENTER - Logs the contact, just as if the user has pressed Enter from N3FJP Software's main form. The QSO record is written to the log file with all data currently in the text boxes and additional details such as the ADIF country number are saved as well. The main list and multiplier lists are then updated and the main form text boxes are cleared, ready for the next QSO. Just make sure the program is set to the correct band and mode first as detailed in the changing band, mode and frequency section.
CLEAR - Clears all text boxes.
CALLTAB - This performs all the functions associated with tabbing from the Call field including dupe check (contesting software only), listing previous contacts and retrieving previous contact info. In AC Log, it also initiates call book lookup (if enabled), checks Watch List, etc. In short, it makes lots happen, so I strongly recommend sending the CALLTAB command immediately after sending a call value to the call text box in both the contesting software and AC Log.
DUPECHECK - Performs dupe check function and associated events in N3FJP Software. Only applicable to contest software. DUPECHECK is one of many methods called in the CALLTAB function, so if you are already firing the CALLTAB function (recommended), there is no need to also call the DUPECHECK function. If you only want to query to see if the contact is a dupe without N3FJP Software performing any actions, use the second DUPECHECK command below, that is not associated with the Action commands.
Send an Action command like this:
<CMD><ACTION><VALUE>ENTER</VALUE></CMD>
The ENTER action is the only action command that returns a value, which is the number of records added (typically 1 if the record was added or 0 if it wasn't). N3FJP Software responds as follows:
<CMD><ENTERRESPONSE><VALUE>1</VALUE></CMD>
Note that while the number of records in RAM is instantly increased, depending on the user's system, it may be 100 milliseconds or more before the log file is updated, because it is handled by a different thread. So, if you are querying the actual log file directly, allow sufficient time for the QSO record to be added before firing your SQL query.
Optionally Receive Notifications for ALL Text Entry Box Updates
Want to see more data? If you'd like your application to receive every textbox change notification that your app or the user makes to N3FJP Software, you can!
For example, when the user (or your App) puts an N in the Call field, not only is the Call Field Updated, but also the Country Worked, CQ Zone, ITU Zone, Prefix, etc. Try enabling rig interface and watch the additional updates that come in each time you touch the VFO. Every time the user changes frequency to a new band and mode, frequency, band and mode changes will be sent.
With this option enabled, you will be able to stay in complete sync with what is happening in every field in the N3FJP Software application!
This option is disabled by default when the program first starts. After you connect, to set the All Updates state to True, send the following:
<CMD><SETUPDATESTATE><VALUE>TRUE</VALUE></CMD>
N3FJP Software responds:
<CMD><SETUPDATESTATERESPONSE><VALUE>TRUE</VALUE></CMD>
To disable the option, send FALSE.
As any change event occurs in a text box, N3FJP Software will send the name of the control and its current value:
<CMD><UPDATERESPONSE><CONTROL>TXTENTRYSECTION</CONTROL><VALUE>MDC</VALUE></CMD>
Reading Band, Mode and Frequency
Use this command to read the band, mode and frequency (frequency if rig interface is enabled):
<CMD><READBMF></CMD>
N3FJP Software responds:
<CMD><READBMFRESPONSE><BAND>40</BAND><MODE>SSB</MODE><MODETEST>PH</MODETEST><FREQ>7.22802</FREQ></CMD>
Note that MODETEST (short for mode contest) is used for contest dupe checking and will always have a value that must be CW, PH or DIG. Mode may or may not have a value depending on whether rig interface is enabled.
Also note that if you enable the All update notification option, the controls for LBLBAND and LBLMODE will update each time your app or the user changes band or mode in the contesting software.
New in 0.8, this command will also be sent automatically each time the user changes band, mode or frequency.
Changing Band, Mode and Frequency
Before you send the enter command to enter a QSO, you (or the user) must first have N3FJP software set to the correct band and mode!
It's only necessary to change band and mode if the desired values aren't already selected by the user, a previous command from your app or returned by rig interface in N3FJP software. There are several ways to accomplish this, but I recommend using this first approach, as it will function regardless of whether the user has enabled rig interface in N3FJP software or not.
After updating the individual fields as detailed in the Textbox section above or using CONTESTEX below, your command sequence would look like this:
<CMD><IGNORERIGPOLLS><VALUE>TRUE</VALUE></CMD>
<CMD><CHANGEBM><BAND>40</BAND><MODE>FT8</MODE></CMD>
<CMD><UPDATE><CONTROL>TXTENTRYMODE</CONTROL><VALUE>FT8</VALUE></CMD> This line is no longer needed with API 1.4.
<CMD><UPDATE><CONTROL>TXTENTRYFREQUENCY</CONTROL><VALUE>7.086</VALUE></CMD>
<CMD><ACTION><VALUE>ENTER</VALUE></CMD>
<CMD><IGNORERIGPOLLS><VALUE>FALSE</VALUE></CMD>
IGNORERIGPOLLS ensures your values won't be overwritten if the user has rig interface enabled and the rig happens to be polled at the exact moment of the enter sequence. After you set the value to true, you should then clear or replace any existing band, mode and frequency text box values before entering the QSO. After you have allowed sufficient time for your action to complete, please remember to set IGNORERIGPOLLS back to false at the end of your enter sequence.
Setting the frequency is optional. If you don't write a frequency and the user has rig interface enabled, the last polled frequency will be saved as part of the QSO record.
The above method is recommended, since it will work whether rig interface is enabled or not. Here are other options:
If the user has rig interface enabled, you can change bands and mode via the rig interface commands as follows:
To see if the user has rig interface enabled: (A rig name is returned if so, otherwise None is returned):
<CMD><RIGENABLED></CMD>
N3FJP Software responds:
<CMD><RIGRESPONSE><RIG>Icom</RIG></CMD>
Updating Band, Mode and Frequency with Rig Interface Enabled:
To send a Frequency change command (sending a frequency in the CW or SSB portions of the band will cause the mode to default to CW or PH unless you set the optional SUPPRESSMODEDEFAULT to true):
<CMD><CHANGEFREQ><VALUE>21.446</VALUE></CMD>
N3FJP Software sends the following after receiving CHANGEFREQ from your app:
<CMD><CHANGEFREQRESPONSE><VALUE>21.446</VALUE></CMD>
If you don't want the rig to default to SSB or CW, depending on frequency, send it this way (new in 0.8):
<CMD><CHANGEFREQ><VALUE>21.446</VALUE><SUPPRESSMODEDEFAULT>TRUE</SUPPRESSMODEDEFAULT></CMD>
If you want a mode other than default, send the mode command first as in the following example. Then follow up with the CHANGEFREQ command (if frequency requires changing) with the SUPPRESSMODEDEFAULT set to True as above.
<CMD><CHANGEMODE><VALUE>RTTY</VALUE></CMD>
Typical mode values include CW, LSB, USB, AM, FM, RTTY. Some rigs support additional values, coded on a case by case basis.
Updating Band, Mode and Frequency with Rig Interface Disabled:
If the user is NOT using rig interface, change bands and / or modes as follows (zero length values are ignored). Remember, this method will not work if rig interface is enabled.
<CMD><CHANGEBM><BAND>40</BAND><MODE>CW</MODE></CMD>
Dupe Check
This command will allow the calling software to check if the QSO is a duplicate without firing any of the duplicate actions in N3FJP Software (that would be called if you use the DUPECHECK in the ACTION commands above). With this command, if it is a duplicate, different details about the previous QSO, depending on the contest are returned. If not a duplicate, the value is zero length. This command is only applicable to the contest software (state QSO party programs don't currently return values, so use the Action DUPECHECK command instead for those programs). In 0.8 and later you will also receive a CALLTABDUPEEVENT response as well.
Another alternative, new in 0.8, is to watch for the CALLTABDUPEEVENT that is sent automatically (see Other Notifications below). CALLTABDUPEEVENT is supported in the state QSO party software too.
To see if the QSO is a duplicate:
<CMD><DUPECHECK><CALL>W1AW</CALL><BAND>10</BAND><MODE>CW</MODE></CMD>
If a duplicate, the Value might look something like this:
<CMD><DUPECHECKRESPONSE><CALL>W1AW</CALL><VALUE>Duplicate! W1AW at 2/09 19:25 on 10 CW Rec# 4</VALUE></CMD>
Sending Contest Exchange to Contest Software
New with version 1.3, you can send the entire contest exchange to any contest program with a single command. The exchange can be either space or pipe delimited and must include all elements of the exchange.
You only need to use pipes if two words may be needed for a single field (such as counties), of if there are blank fields in the exchange. When using pipes, you must use them for the entire exchange.
Format the command like these examples:
ARRL RTTY:
<CMD><CONTESTEX><VALUE>KA3SEQ 599 MD</VALUE></CMD>
Field Day:
<CMD><CONTESTEX><VALUE>KA3SEQ 2A MDC</VALUE></CMD>
PA QSO Party (pipe delimited example):
<CMD><CONTESTEX><VALUE>KA3SEQ|123|PA|Mc Kean</VALUE></CMD>
The CALLTAB action is called by default when the data is received, but you can suppress that if you need to for any reason like this:
<CMD><CONTESTEX><VALUE>KA3SEQ 599 123</VALUE><SUPPRESSCALLTAB>TRUE</SUPPRESSCALLTAB></CMD>
Our software will check the data when you call the enter command. If it is invalid, it will alert the user, so the user can intervene from there.
Other Queries and Commands
To determine the next serial number to be sent:
<CMD><NEXTSERIALNUMBER></CMD> (only functions in programs where a serial number is required).
N3FJP Software responds:
<CMD><NEXTSERIALNUMBERRESPONSE><VALUE>123</VALUE></CMD>
Note, with 1.0 the above will be sent each time the value is calculated (following each enter, edit and delete event, in programs where serial number is used).
New in version 1.3, you can also set the next serial number to be sent:
<CMD><SETSERIALNUMBER><VALUE>12</VALUE></CMD>
To determine the program and version that you are connected to:
<CMD><PROGRAM></CMD>
N3FJP Software responds:
<CMD><PROGRAMRESPONSE><PGM>N3FJP's Amateur Contact Log</PGM><VER>5.5</VER><APIVER>0.6.2</APIVER></CMD>
To determine the API version (new in 0.6.2):
<CMD><APIVER></CMD>
N3FJP Software responds:
<CMD><APIVERRESPONSE><APIVER>0.6.2</APIVER></CMD>
To find the log file that the user currently has open, send this command:
<CMD><FILEPATH></CMD>
N3FJP Software responds:
<CMD><FILEPATHRESPONSE><VALUE>C:\Users\snkda\My Documents\Affirmatech\N3FJP Software\Template\LogData.mdb</VALUE><CMD>
To find the path to the settings file (new in 0.8), send this command:
<CMD><SETTINGSPATH></CMD>
N3FJP Software responds:
<CMD><SETTINGSPATHRESPONSE><VALUE>C:\Users\snkda\My Documents\Affirmatech\N3FJP Software\ACLog\Settings.xml</VALUE></CMD>
To find the path to the N3FJP Software Shared Folder (new in 0.8), send this command:
<CMD><SETTINGSPATHSHARED></CMD>
N3FJP Software responds:
<CMD><SETTINGSPATHSHAREDRESPONSE><VALUE>C:\Users\snkda\My Documents\Affirmatech\N3FJP Software\Shared</VALUE></CMD>
To retrieve the basic user settings entered on the setup form:
<CMD><GETUSERSETTINGS></CMD>
N3FJP Software responds:
<CMD><GETUSERSETTINGSRESPONSE><CALL>N3FJP</CALL><COUNTRY>USA</COUNTRY><CONT>NA</CONT><LAT>39.52</LAT><LON>-76.32</LON><OPERATOR>N3FJP</OPERATOR></CMD>
To check the number of QSOs in the log:
<CMD><QSOCOUNT></CMD>
N3FJP Software responds:
<CMD><QSOCOUNTRESPONSE><VALUE>10</VALUE></CMD>
To check the QSO rate and other contest specific label displays (not applicable to AC Log)(New in version 0.9):
<CMD><QSORATE></CMD>
N3FJP Software responds with the QSO rates and the contest specific labels and their values. Here is the Field Day response:
<CMD><QSORATERESPONSE><20MIN>3</20MIN><60MIN>1</60MIN><L1>Total CW Contacts</L1><V1>1</V1><L2>Total Phone Contacts</L2><V2>8</V2><L3>Total DIG Contacts</L3><V3>9</V3><L4>Total QSO Points</L4><V4>28</V4><L5></L5><V5></V5></CMD>
To send a rig control command directly to a rig (will send any command directly to the rig, as long as the com port is open). (New in version 0.9):
<CMD><SENDRIGCOMMAND><VALUE>Command to send to rig</VALUE></CMD>
To retrieve a list of visible fields (users can customize which fields are visible in AC Log, but you can read and write to the fields, regardless of whether they are visible or not) and their values:
<CMD><VISIBLEFIELDS></CMD>
To retrieve a list of all the fields, regardless of their visibility and their values:
<CMD><ALLFIELDS></CMD>
To retrieve a list of all the fields with values, regardless of their visibility and their values (only fields with values are returned):
<CMD><ALLFIELDSWITHVALUES></CMD>
To retrieve the tab index of all fields or visible fields (new in 1.1):
<CMD><ALLFIELDSTAB></CMD> or <CMD><VISIBLEFIELDSTAB></CMD>
To retrieve the list of user customized Other field titles (new in 2.2):
<CMD><GETOTHERFIELDTITLES></CMD>
To refresh N3FJP Software's main form list with a specific number of records, send the following, where value is the number of records to display:
<CMD><MAINFORMLIST><VALUE>200</VALUE></CMD>
To retrieve user values from N3FJP Software (new in 0.6.2):
<CMD><OPINFO></CMD>
Fields with values are returned including CALL, NAME, STATE, SECTION, CLASS, COUNTRY, CQZ, ITUZ, LAT, LONG, CNTY, CONT and GRID.
To set user values in N3FJP Software (new in 1.8):
<CMD><SETOPINFO><CALL>N3FJP</CALL><NAME>Scott</NAME><GRID>FM19</GRID><STATE>MD</STATE></CMD>
Fields with values that can be set include CALL, NAME, STATE, SECTION, CLASS, COUNTRY, CQZ, ITUZ, LAT, LONG, CNTY, CONT and GRID.
Note that the Settings > Setup form must be closed when the command is sent, or user data in those text boxes will overwrite your command when the user closes the form.
To determine rig interface polling rate (new in 1.9.):
<CMD><GETRIGPOLLINGRATE></CMD>
N3FJP Software responds with the polling rate the user has set in milliseconds:
<CMD><GETRIGPOLLINGRATERESPONSE><VALUE>500</VALUE></CMD>
To ignore rig interface polls (new in 0.6.2):
<CMD><IGNORERIGPOLLS><VALUE>TRUE</VALUE></CMD>
Make sure you set the value back to false!
Update the dialogue label so that you can send messages to users. Forecolor and Backcolor will remain the current color if not included. If Voice Navigation is enabled, the text will also be spoken. Note that color schemes for AC Log and the contesting software are different and that AC Log's dialogue isn't multi line, while all the contesting programs are multi line (new in 0.6.2):
<CMD><UPDATEDIALOGUE><VALUE>Message text here</VALUE><FORECOLOR>Blue</FORECOLOR><BACKCOLOR>White</BACKCOLOR></CMD>
To send text for N3FJP Software to speak (regardless of Voice Navigation setting) (new in 0.6.2):
<CMD><SPEAKTEXT><VALUE>Text to speak</VALUE></CMD>
To see if a rig interface offset value is enabled:
<CMD><READOFFSETENABLED></CMD>
To enable the offset function (only applies to CW portion of band):
<CMD><SETOFFSETENABLED><VALUE>TRUE</VALUE></CMD>
To read the offset value:
<CMD><READOFFSET></CMD>
To set the offset value:
<CMD><SETOFFSET><VALUE>1500</VALUE></CMD>
To see if the Don't Send Mode Change with Frequency option is set:
<CMD><READMODEDEFAULTSUPPRESS></CMD>
To enable the the Don't Send Mode Change with Frequency option:
<CMD><SETMODEDEFAULTSUPPRESS><VALUE>TRUE</VALUE></CMD>
Please listen for the SEND command to transmit data from N3FJP (added with Worked All Europe in mind). Examples your app may receive (new in 1.2):
<CMD><SEND><VALUE>R U QRV?</VALUE></CMD>
<CMD><SEND><IDTAG>WAEHDR</IDTAG><VALUE>QTC 3/10</VALUE></CMD>
<CMD><SEND><IDTAG>WAEQTC</IDTAG><VALUE>1958 CT6A 56</VALUE>
Set your app to transfer Worked All Europe QTCs to N3FJP's WAE QTC Received form using the RECEIVE command. Examples N3FJP's WAE software is looking for from your app (new in 1.2):
<CMD><RECEIVE><IDTAG>WAEHDR</IDTAG><VALUE>2/5</VALUE></CMD>
<CMD><RECEIVE><IDTAG>WAEQTC</IDTAG><VALUE>1823 LA9C 12</VALUE></CMD>
<CMD><RECEIVE><IDTAG>WAEQTC</IDTAG><VALUE>1823 LA9C 12</VALUE><QTCNO>3</QTCNO></CMD> Use the QTCNO tag to fill a specific slot (slot 3 in this case) of the QTC received form. When absent, the next open field is filled by default.
Even if you don't wish to add the RECEIVE command, please consider listening for the SEND command above, as that will be a great help for users wishing to easily send properly formatted QTCs.
Keydown Events
You can optionally receive F Key presses or all keydown presses from N3FJP Software (new in 0.6.2). Use this feature to fire functions in your program while N3FJP Software has focus. Values returned from the Form_Keydown method are sent.
To enable this feature send (where 0 = off, 1 = F keys only, 2 = All keydown events):
<CMD><SETKEYBOARDSTATE><VALUE>1</VALUE></CMD>
When the user presses F1 without holding a modifying character (Shift, etc.) N3FJP Software sends this:
<CMD><KEYDOWN><KEYCODE>F1</KEYCODE><MODIFIERKEYS>None</MODIFIERKEYS></CMD>
List
To retrieve a large number of QSO records from N3FJP software to your app, I recommend connecting directly to the log file as detailed in the Log File section below, but I've added the ability to retrieve QSO data via N3FJP Software directly as well. To see the tags used, edit a record in our software, give every field a value and then try the commands on that record. Here are few examples:
<CMD><LIST></CMD> - Retrieves all records, but only includes these fields: Call, Date, Time On, Band, Mode and Mode Contest.
<CMD><LIST><INCLUDEALL></CMD> - Same as above, except EVERY field with a length greater than zero is returned.
<CMD><LIST><INCLUDEALL><VALUE>20</VALUE></CMD> - Lists the most recent 20 QSOs and includes all fields with values.
<CMD><LIST><VALUE>25</VALUE></CMD> - Retrieves primary fields for the 25 most recent QSOs.
Search
Like the list function, I recommend connecting directly to the log file as detailed in the Log File section below for intensive data retrieval, but I've added the ability to search QSO data via N3FJP Software directly as well.
To see the tags used to identify the data returned, edit a record in our software, give every field a value and then try the commands on that record. In most cases, txtEntry has just been dropped from the name (as listed below).
You can include any of the following criteria in any order: CALL, BAND, MODE, COUNTRYWORKED, DXCC (Country Number) and CONFIRMED. Criteria not included is ignored in the search. Here is the longest form of the command:
<CMD><SEARCH><INCLUDEALL><CALL>KL8B</CALL><BAND>15</BAND><MODE>PH</MODE><COUNTRYWORKED>Alaska</COUNTRYWORKED><DXCC>6</DXCC><CONFIRMED>TRUE</CONFIRMED><MAXRECORDS>3</MAXRECORDS></CMD>
Some comments on the less obvious fields:
<INCLUDEALL> Without this tag, the only fields returned are Call, Date, Time On, Band, Mode and Mode Contest. Include this tag and EVERY field with a length greater than zero is returned.
<MODE> The mode contest field (CW, PH or DIG) is evaluated. If you send other modes such as SSB or RTTY, our software will convert to PH or DIG before performing the query.
<COUNTRYWORKED> The name must match exactly. If you are uncertain about the possible spelling, use the ADIF DXCC number instead.
<DXCC> Use to query by DXCC country number instead of the country name as detailed in <COUNTRYWORKED>.
<CONFIRMED> You'll typically only include this argument when connected to our general logging program - Amateur Contact Log. Use TRUE when you want the list to only include confirmed QSOs, FALSE for unconfirmed, or don't include the criteria if you want both confirmed and unconfirmed.
<MAXRECORDS> Include this argument if you wish to limit the number of records returned. It's a good option for determining if an entity has been worked, without receiving a long list of records.
Examples (a few of the many possible, but I think you'll get the idea):
<CMD><SEARCH><CALL>KL8B</CALL></CMD> Returns all QSOs with KL8B.
<CMD><SEARCH><CALL>W1AW</CALL><MODE>CW</MODE></CMD> Returns all QSOs with W1AW on CW.
<CMD><SEARCH><BAND>15</BAND><MODE>CW</MODE></CMD> Returns all QSOs on 15 CW.
<CMD><SEARCH><COUNTRYWORKED>Madeira Is.</COUNTRYWORKED></CMD> Returns all QSOs with Madeira Is. provided the spelling (and island abbreviation) matches EXACTLY.
<CMD><SEARCH><DXCC>256</DXCC><CONFIRMED>TRUE</CONFIRMED></CMD> Returns all confirmed QSOs with Madeira Is., regardless of spelling.
Check Entity Status in Connected Log
Something that I've always wondered while working contests and running a contesting program is whether the juicy DX I am calling is confirmed on that band and mode in my master log on Amateur Contact Log or not. In fact, some contests are as much about collecting new entities as the event itself!
With earlier versions of the API you could check that with the Search feature, but I've added an additional command in 0.7 to make it much easier! Just send:
<CMD><ATNO><BAND>20</BAND><MODE>CW</MODE><COUNTRYWORKED>Kenya</COUNTRYWORKED></CMD>
Or:
<CMD><ATNO><BAND>20</BAND><MODE>CW</MODE><DXCC>430</DXCC></CMD>
N3FJP Software responds:
<CMD><ATNORESPONSE><COUNTRYWORKED>Kenya</COUNTRYWORKED><DXCC></DXCC><VALUE>BMC</VALUE><BAND>20</BAND><MODE>CW</MODE></CMD>
Mode values are converted to CW, PH or DIG. The return code values are derived as follows and evaluated in this order on the server:
if (InLog == false)
ResultValue = "ATNO"; //All Time New One!
if (OverallWorked == true)
ResultValue = "OW"; //Entity worked on any band or mode
if (OverallConfirmed == true)
ResultValue = "OC"; //Entity confirmed on any band or mode
if (OverallConfirmed == false && BandAndModeWorked == true)
ResultValue = "OWBMW"; //Entity not confirmed on any band, but has been worked on the current band and mode
if (OverallConfirmed == true && BandAndModeWorked == true)
ResultValue = "OCBMW"; //Enity confirmed on other bands / modes, has been worked on this band / mode, but not confirmed
if (BandAndModeConfirmed == true)
ResultValue = "BMC"; //Entity confirmed on this band and mode.
Get Dynamic Results
Retrieves data in format uploaded to online score sites such as ContestOnLine (new in 2.1)
<CMD><GETDYNAMICRESULTS></CMD>
Receive Notification of user pressing enter and tabbing from the Call field
New in 0.8, N3FJP Software will automatically notify your app when the user has entered a contact or tabbed from the call field.
Data sent to your app on enter:
<CMD><ENTEREVENT><QSOCOUNT>765</QSOCOUNT><CALL>LA9A</CALL><BAND>10</BAND><MODE>CW</MODE><MODETEST>CW</MODETEST><COUNTRY>Norway</COUNTRY><DXCC>266</DXCC><CONT>EU</CONT><QSO_DATE>20160810</QSO_DATE><TIME_ON>144300</TIME_ON></CMD>
Data sent to your app when tabbing from the Call field:
<CMD><CALLTABEVENT><CALL>LA9A</CALL><BAND>10</BAND><MODE>CW</MODE><MODETEST>CW</MODETEST><COUNTRY>Norway</COUNTRY><DXCC>266</DXCC><MYCALL>N3FJP</MYCALL><OPERATOR>N3FJP</OPERATOR><QSOCOUNT>65333</QSOCOUNT><PFX>LA9</PFX><CONT>EU</CONT><CQZ>14</CQZ><ITUZ>18</ITUZ><LAT>61</LAT><LON>9</LON><BEARING>37</BEARING><LONGPATH>217</LONGPATH><DISTANCE>3,732</DISTANCE></CMD>
If you don't want to receive these notifications send:
<CMD><CALLTABENTEREVENTS><VALUE>FALSE</VALUE></CMD>
Other Notifications
If the user changes frequency via rig interface (clicks on a DX Spot or enters a frequency in the Call field with rig interface enabled) the following is sent to your app:
<CMD><CHANGEFREQ><VALUE>21.446</VALUE></CMD>
If the change frequency command was initiated via your app using the CHANGEFREQ command with the API:
<CMD><CHANGEFREQRESPONSE><VALUE>21.446</VALUE></CMD>
New in 0.8, any time the user changes band, mode or frequency, a READBMFRESPONSE is sent to you app automatically (see above for details).
New in 0.8, if the user tabs from the Call field and the call is a duplicate, N3FJP Sofware will send the following (not applicable to AC Log):
<CMD><CALLTABDUPEEVENT><CALL>N8II</CALL><BAND>20</BAND><MODE>CW</MODE><MODETEST>CW</MODETEST><VALUE>Duplicate! N8II at 8/06 20:08 on 20 CW Rec# 4</VALUE></CMD>
Receive notification when user swaps rigs from main form via Ctrl X (new in 1.0):
<CMD><RIGSWAPEVENT><RIG>Icom</RIG><RIGINDEX>0</RIGINDEX></CMD>
Receive notification when user edits or deletes a record (new in 1.0).
<CMD><EDITDELETEEVENT></CMD>
Lookup Country List Data
New in 0.6.2, your app can lookup country list data (currently maintained by Jim, AD1C) and information that can be gleaned from the call sign as follows:
<CMD><COUNTRYLISTLOOKUP><CALL>5Y7A</CALL></CMD>
Data returned includes Country, the ADIF DXCC number, Continent, CQ Zone, ITU Zone, Latitude, Longitude (western values are positive) and Prefix:
<CMD><COUNTRYLISTLOOKUPRESPONSE><CALL>5Y7A</CALL><COUNTRY>Kenya</COUNTRY><DXCC>430</DXCC><CONT>AF</CONT><CQZ>37</CQZ><ITUZ>48</ITUZ><LAT>0.3</LAT><LON>-38.2</LON><PFX>5Y7</PFX></CMD>
Monitoring DX Spots
You can optionally set N3FJP Software to relay DX Spots to your application! These spots are those received after any filtering that has been applied (More Filtering button on the DX Spotting set up form). To turn on the DX Spots relay, send this command:
<CMD><RELAYDXSPOTS><VALUE>TRUE</VALUE></CMD>
Each time a DX Spot is received, it will be relayed to your software as follows (note that country, band, mode and LoTW status are only returned in AC Log).
<CMD><DXSPOT><CALL>8R1RPN</CALL><PFX>8R</PFX><FREQ>14.0143</FREQ><TIME>18:49</TIME><COUNTRY>Guyana</COUNTRY><BAND>20</BAND><MODE>CW</MODE><MULT>New!</MULT><LOTW>L</LOTW></CMD>
N3FJP Form Size and Location (Reading and Changing)
You may wish to retrieve or set the form size and location of the main N3FJP Software form, so that you can display your form nicely adjacent to it on the user's screen (new in 0.6.2). To retrieve the display properties of the form send:
<CMD><FORMINFO></CMD>
N3FJP Software responds:
<CMD><FORMINFORESPONSE><LEFT>0</LEFT><TOP>0</TOP><WIDTH>1738</WIDTH><HEIGHT>1040</HEIGHT><WINDOWSTATE>Normal</WINDOWSTATE></CMD>
You can relocate the form, resize it and set the WINDOWSTATE (Normal, Minimize or Maximize) of N3FJP Software's main form from your app. The following is the full expression of the command. Tags not included are left at current values.
<CMD><FORMSET><LEFT>0</LEFT><TOP>0</TOP><WIDTH>1738</WIDTH><HEIGHT>1040</HEIGHT><WINDOWSTATE>NORMAL</WINDOWSTATE></CMD>
Add ADIF Record (new in 2.0)
This command will add the record direct to the log file and then immediately load it in the user's list of recent contacts. Since it is added directly to the log file, any callbook lookup, scoring for contests, etc., is bypassed.
The software will actually write the received API data as an ADIF file and import it normally. Any fields in AC Log and any ADIF tags users have given to any of the 8 Other fields will be supported.
<CMD><ADDADIFRECORD><VALUE><CALL:6>KA3SEQ<QSO_Date:8>20220317<Time_On:6>205405<Band:3>40M<Mode:3>SSB<EOR></VALUE></CMD>
Adding Records Direct to Log File via API
The Action Enter command is the recommended method of entering contacts, especially in the contesting software where QSO points, multipliers, etc., are assigned on entry, but in version 0.6.2 I've added the ability to add direct as well. In most cases you can replace the txtEntry with fld as the prefix for the field name, or see the Log File section SQL query example for all the field names. Here is an example:
<CMD><ADDDIRECT><EXCLUDEDUPES>TRUE</EXCLUDEDUPES><STAYOPEN>TRUE</STAYOPEN><fldCall>N3FJP</fldCall><fldDateStr>2016/04/30</fldDateStr><fldTimeOnStr>12:34</fldTimeOnStr><fldBand>15</fldBand><fldMode>CW</fldMode><fldFrequency>21.026</fldFrequency><fldNameR>Scott</fldNameR></CMD>
If you set the EXCLUDEDUPES value to TRUE, designed with AC Log rather than contesting in mind, a record is only ignored if all the following criteria match: Call, Date, Time On (minute resolution), Band, Mode, Grid Received, Grid Sent, County Received, County Sent and State. Please note that if one record has a field listed above with a value and the field of the record compared to is blank, it will not be considered a duplicate.
Keep the <STAYOPEN> tag set to TRUE if you are adding multiple records to keep the SQL connection open for faster transfer. On the last record you send, set it to FALSE (or alternatively, immediately follow up with <CMD><SQLCLOSE></CMD>).
After you have sent one or more records and then closed the SQL connection, send this command to have N3FJP Software immediately detect the additional entries, load and list them:
<CMD><CHECKLOG></CMD>
Log File
The log file is a standard Microsoft Access database. The QSO records are stored in tblContacts. You can read and update this database directly from your program via SQL statements, to assist in whatever functions you would like your application to perform.
Of course, the preferred method of adding records is using the Action ENTER command via N3FJP Software detailed above, but with care, you can add records directly from your application too. If you add a record directly, please include every field (even if it is zero length) and be sure that you do not include any null values. Also, please be sure to precisely follow the date (ex: 2016/04/15) and time (ex: 12:46) format conventions that you will see in the records added directly by our software exactly (it is imperative that you use the / character for the date separator and : for the time separator).
All our software checks the data file at the Refresh Rate the user has specified (Settings > Refresh Rate), which is between 60 seconds and 6 seconds. If you add a record directly to the log file, it will appear in the list within 60 seconds. Alternatively, you can send CHECKLOG or OPENLOG (detailed just below in this section) for an immediate response and updated list display.
An SQL statement to add a record looks like this:
insert into tblContacts (fldAge, fldARCI, fldBand, fldCall, fldCategory, fldCheck, fldClass, fldComments, fldComputerName, fldContestID, fldContinent, fldCountryDXCC, fldCountryWorked,fldCountyR, fldCountyS, fldCQZone, fldDateStr, fldFists, fldFrequency, fldFuture1, fldFuture2, fldGridR, fldGridS, fldIARUZone, fldInitials,fldIOTA, fldITUZone, fldLightHouse, fldMode, fldModeContest, fldNameR, fldNameS, fldOperator, fldOther1, fldOther2, fldOther3, fldOther4, fldOther5, fldOther6, fldOther7, fldOther8, fldPoints, fldPower, fldPrecedence,fldPrefix, fldPropMode, fldQSLConfByR, fldQSLConfByS, fldQSLR, fldQSLS, fldQTHGroup, fldRstR, fldRstS, fldSatName, fldSection, fldSerialNoR, fldSerialNoS, fldSPC, fldSPCNum,fldState, fldStation, fldTenTen, fldTimeOffStr, fldTimeOnStr, fldTransmitterID)VALUES ('' , '' , '10' , 'W1AW' , '' , '' , '' , 'ARRL HQ OPERATORS CLUB - 225 MAIN ST - NEWINGTON, CT 06111' , 'Iron-Man' , '' , 'NA' , '291' , 'USA' , 'Hartford' , '' , '05' , '2016/04/15' , '' , '28.36704' , '' , '' , 'FN31pr' , '' , '' , '' , '' , '08' , '' , 'SSB' , 'PH' , 'Dan' , '' , '' , '' , '' , '' , '' , '' , '' , '' , '' , '0' , '500' , '' , 'W1' , '' , '' , '' , 'N' , 'N' , '' , '59' , '59' , '' , '' , '' , '' , '' , 'CT' , 'CT' , 'Iron-Man' , '' , '' , '12:46' , '')
If you would like for your changes to appear more quickly, after closing your connection to the log file, send either of these commands as appropriate:
<CMD><CHECKLOG></CMD> This initiates the process where the program checks for and loads new records (if any exist), so it is much faster than OPENLOG (CHECKLOG is new in 0.6.1). Send this immediately after you close your connection to the log file (or immediately after you send the SQLCLOSE command (detailed just below) if you are using our software to send the SQL statements).
<CMD><OPENLOG></CMD> This opens the entire log file, so it is the best choice if you have edited existing records.
Please note that all our applications are contest specific. Depending on the contest, some of the N3FJP Software programs assign points and other important contest details on entry and field usage may vary. If you add data directly from your application instead of using the preferred N3FJP Software Action ENTER command, please be sure that you follow the example conventions of other test records you've entered via the specific N3FJP Software application you are coding for.
To find the log file that the user currently has open, send this command:
<CMD><FILEPATH></CMD>
N3FJP Software responds:
<CMD><FILEPATHRESPONSE><VALUE>C:\Users\snkda\My Documents\Affirmatech\N3FJP Software\Template\LogData.mdb</VALUE></CMD>
You can also send SQL commands to the database via N3FJP Software. Obviously this must be performed with extreme care! If you aren't sure what you are doing, use the action ENTER command detailed above. To send an SQL command via N3FJP Software, send:
<CMD><SENDSQLSTAYOPEN><VALUE>Your SQL statement</VALUE></CMD>
After you have sent one or more commands, you MUST close your connection to the file. To close the connection, send this:
<CMD><SQLCLOSE></CMD>
Sending CW
New with 0.6.2, you can send CW if the user has CW set up properly in N3FJP Software:
Send text:
<CMD><CWSEND><VALUE>CQ DE N3FJP K</VALUE></CMD>
If you need to stop the text currently being sent:
<CMD><CWSTOP></CMD>
Set CW Speed:
<CMD><CWSETSPEED><VALUE>20</VALUE></CMD>
Increase speed by X WPM
<CMD><CWFASTER><VALUE>2</VALUE></CMD>
Decrease speed by X WPM
<CMD><CWSLOWER><VALUE>2</VALUE></CMD>
Placing Rig in Transmit and Receive
New with 0.8, you can use the comm port settings users have selected by clicking Settings > Transmit > CW to place their rig in transmit mode, to send digital from your app, etc.
Key Down:
<CMD><CWCOMPORTKEYDOWN></CMD>
Key Up:
<CMD><CWCOMPORTKEYUP></CMD>
Another option, if rig interface is enabled:
Transmit: <CMD><RIGTX></CMD>
Receive: <CMD><RIGRX></CMD>
Note that the rig interface option has only been tested with Icoms, Kenwoods and a few Yaesus and very likely will need tweaking to get other rig flavors going.
Rig Interface From Your Application
New in 0.8, your app can connect to the user's rig and simulate rig interface to N3FJP Software, just by sending this command:
<CMD><SENDRIGPOLL><FREQ>14.071</FREQ><MODE>DIG</MODE></CMD>
Our software will behave just as if it was doing the polling!
In addition, clicking on a DX Spot in N3FJP Software, or typing a frequency in the Call field and pressing enter will send this command to your app (provided you have sent at least one SENDRIGPOLL command first):
<CMD><CHANGEFREQ><VALUE>14.07</VALUE></CMD>
Reindex for WSJT-X and similar programs
New in 1.7, When your app wishes N3FJP to reindex lookups for WSJT based on current WSJT band and mode, send this:
<CMD><REINDEXWSJT><MODE>FT8</MODE><FREQ>14.074</FREQ></CMD>
Update a QSO in progress from WSJT-X and similar programs
New in 1.7, designed to handle updating data fields for an uncompleted QSO in progress with WSJT type field data. Band is not required if frequency is provided.
<CMD><QSOINPROGRESS><CALL>WC3N</CALL><BAND>20</BAND><MODE>FT8</MODE><FREQ>14.074</FREQ></CMD>
Get Call & QTH info for WSJT-X and similar programs
New in 1.7, designed to retrieve information related to the call sign including country, bearing, distance, confirmation status, etc.
<CMD><GETCALLQTHINFO><CALL>WC3N</CALL><BAND>20</BAND><<MODE>FT8</MODE></CMD>
Log from WSJT-X and similar programs
New in 1.7, designed to handle logging a QSO record with WSJT type field data. Band is not required if frequency is provided.
<CMD><UPDATEANDLOG><CALL>WC3N</CALL><BAND>20</BAND><MODE>FT8</MODE><FREQ>14.074<RSTR>599</RSTR><RSTS>488</RSTS><GRID>FM19</GRID><POWER>100</POWER><DATE>2021/04/25</DATE><TIMEON>12:34</TIMEON><TIMEOFF>13:03</TIMEOFF></CMD>
Getting Started!
To get a feel for sending commands and seeing the data N3FJP Software provides, here are two easy options. PuTTY is a free client application that is great for experimentation. I've also created a complete, simple C#.NET project that will also send and receive commands. It includes all the source code you need to get started!
If you start with PuTTY, after you download putty.exe from this site:
http://www.chiark.greenend.org.uk/~sgtatham/putty/download.html
Set the parameters like this (make sure you select Telnet) and click Open:
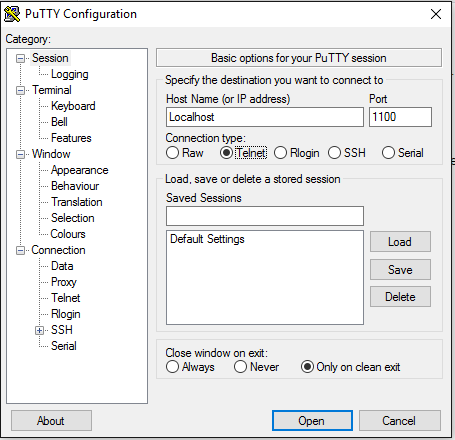
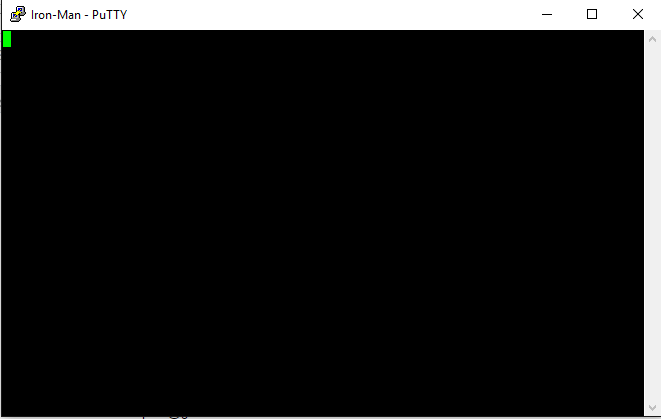
Don't worry about the \r\n terminal character in PuTTY. Everything works fine with the PuTTY default. There isn't anything else you have to do. Just click Open. When you do so, you will see a black form and you should already be connected:
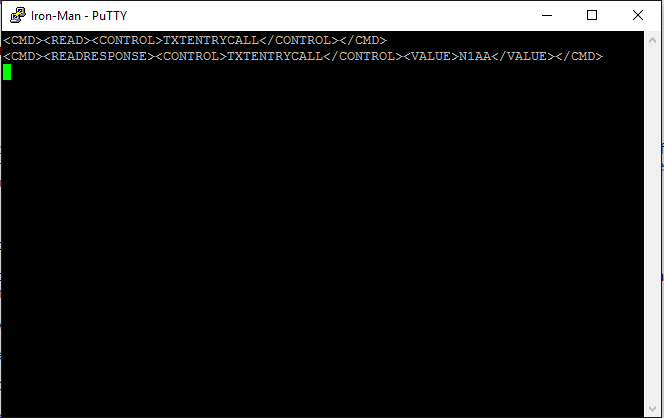
Right click to paste in a command that will return a value as in the first line here. Then press enter. The second line is immediately returned from the software.
Now send this optional all updates command (detailed above), start entering a contact in N3FJP Software and watch all the data you have available to you! With this command enabled, try rig interface too!
<CMD><SETUPDATESTATE><VALUE>TRUE</VALUE></CMD>
TCP Client Code
If you need to add a TCP client to your program to connect with our software, I've experimented with this code (which is in C#.NET, and easily convertible to VB.NET). It has an event driven data arrival method and works fine. Just paste the referenced code into your project. You will be sending data to and receiving data from N3FJP Software in no time!
You can click here to download a complete, simple C#.NET project created in the free version of Visual Studio 2010 Express. This project includes a basic form and the TCP Event Driven Client referenced above, that will connect with our software, send and receive commands.

Some Code Snippets...
Here are a few code snippets to help you get started! The code below is in C#, but I have it in Visual Basic 6 too. Just let me know and I will happily e-mail you the VB6 snippets.
Process Incoming Data
You may receive multiple responses together as one packet. As you receive data from our software, use something like this to parse out the individual commands from your incoming buffer and send them for processing.
For the buffer variable, I used a StringBuilder variable declared outside of this method, which receives all the data as it arrives from your TCP connection. A simple string variable would probably work fine too:
private static void ProcessBuffer()
        {
            try
            {
                int BeginningOfRecord = buffer.ToString().IndexOf("<CMD>");
                if (BeginningOfRecord > -1 && buffer.Length > 5)
                {
                    int EndOfRecord = buffer.ToString().IndexOf("</CMD>", BeginningOfRecord + 5);
                    while (BeginningOfRecord > -1 && EndOfRecord > -1)
                    {
                        string currentRecord = buffer.ToString().Substring(BeginningOfRecord + 5, EndOfRecord - BeginningOfRecord - 5);
                        buffer.Remove(0, EndOfRecord + 6);

                        YourCommandActionMethod(currentRecord);  //This is where you process an individual record
                                                                 //from the incoming data you requested.

                        //See if there is anything more in the buffer
                        BeginningOfRecord = buffer.ToString().IndexOf("<CMD>");
                        if (BeginningOfRecord > -1 && buffer.Length > 5)
                        {
                            EndOfRecord = buffer.ToString().IndexOf("</CMD>");
                        }
                    }
                }
            }
            catch{exception ex}
            {
			//Your error resolution code here.
            }
        }
Parse an individual XML Field from a Full Record
private static string ParseFieldInXMLRecord(string record, string fieldtag)
        {
            string fieldtagStart = "<" + fieldtag.ToUpper() + ">";
            string fieldtagEnd = @"</" + fieldtag.ToUpper() + ">";
            int StartPos = record.ToUpper().IndexOf(fieldtagStart) + fieldtagStart.Length;
            int EndPos = record.ToUpper().IndexOf(fieldtagEnd);
                if (StartPos > -1 && EndPos > -1)
                {
                    return record.Substring(StartPos, EndPos - StartPos);
                }
                else
                {
                    return "";
                }
        }
Create an XML Field with Tags
private static string CreateFieldForXMLRecord(string fieldtag, string value)
        {
            if (value != null && value.Length >0)
            {
            string fieldtagStart = "<" + fieldtag.ToUpper() + ">";
            string fieldtagEnd = @"</" + fieldtag.ToUpper() + ">";
                return fieldtagStart +  value + fieldtagEnd;
            }
            else
            {
                return "";
            }
        }
Get Current Instruction
Note, if you use the Process Incoming Data code above, you'll need to modify this slightly as the <CMD> tags have already been removed from the current record.:
private static string GetCurrentInstruction(string currentRecord)
        {
            if (currentRecord.Length > 5)  //Change to 2 if <CMD> already stripped
            {
                int StartPos = currentRecord.ToUpper().IndexOf("<CMD>");  //Change to "<" if <CMD> already stripped
                int EndPos = currentRecord.ToUpper().IndexOf(">",6);  //Change to 2 if <CMD> already stripped
                if (StartPos > -1 && EndPos > -1)
                {
                    StartPos += 6;  //Change to 1 if <CMD> already stripped
                    return currentRecord.Substring(StartPos, EndPos - StartPos);
                }
                else
                {
                    return "";
                }
            }
            else
                return "";
        }
Text Box List
The following text boxes exist is all our logging programs. Only the text boxes used for any given contest are visible, but all are accessible as detailed above.
lblDialogue
txtEntry1010
txtEntryAge
txtEntryARCI
txtEntryBand
txtEntryCall
txtEntryCategory
txtEntryCheck
txtEntryClass
txtEntryComments
txtEntryContinent
txtEntryCountryWorked *
txtEntryCountyR
txtEntryCQZone
txtEntryDate
txtEntryFists
txtEntryFrequency
txtEntryGrid
txtEntryIARUzone
txtEntryIOTA
txtEntryITUz
txtEntryLightHouse
txtEntryMode
txtEntryNameR
txtEntryOther1
txtEntryOther2
txtEntryOther3
txtEntryOther4
txtEntryOther5
txtEntryOther6
txtEntryOther7
txtEntryOther8
txtEntryPoints
txtEntryPower
txtEntryPrecedence
txtEntryPrefix
txtEntryPropMode
txtEntryQSLConfByR
txtEntryQSLConfByS
txtEntryQSLR
txtEntryQSLS
txtEntryQTHGroup
txtEntryRSTR *
txtEntryRSTS *
txtEntrySatName
txtEntrySection
txtEntrySerialNoR
txtEntrySPC (not currently used)
txtEntrySpcNum *
txtEntryState
txtEntryTimeOff
txtEntryTimeOn
* txtEntryCountryWorked: Please don't send a value to this field. Instead, please let N3FJP Software determine the Country based on the call sign you send to the call field. The country name spelling (including abbreviations) must match our country database exactly, or it won't be included in totals, found in searches, etc. Also note that CQ zone, ITU zone, continent and prefix are determined from the call field as well. Just send a call sign to the Call field in N3FJP Software and let our app do the rest.
* txtEntrySpcNum: The State (or Section) / Province / Country / Number field is used in the contesting software when there are multiple possible exchange values, depending on the QTH of the station being worked. You can check to see if it is used by listing the visible fields (<CMD><VISIBLEFIELDS></CMD>). It is coded in contest specific ways, based on the rules for each contest.
For example, in NAQP, txtEntrySpcNum gets its value from the invisible Country field's text change event. The country field is filled as the user types the call in the call field (or your application sends a call sign to N3FJP Software) as the call text change event fires. In NAQP, if you work a USA or Canadian station, the SPCNum field remains blank, requiring the state / province to be sent by your application or typed in by the user.
* txtEntryRSTR/S: In the contesting software, both these fields fill with defaults if blank when RSTR receives focus, so they will not fill when you fire the Action CALLTAB event. For applicable programs, you can either fill RSTR and RSTS from your application when you fire CALLTAB, or set the focus to RSTR on CALLTAB.
Digital Contest Fields
If you are writing a digital application to fill fields in our contest software, here are the fields needed for the major digital contests I support. You will want your users to be able to send to N3FJP Software from your decode window the following:
txtEntry1010
txtEntryCall
txtEntryCheck (only needed for Rookie Roundup)
txtEntryClass
txtEntryCountyR
txtEntryGrid
txtEntryNameR
txtEntryRSTR (see note above)
txtEntryRSTS (see note above)
txtEntrySection
txtEntrySerialNoR
txtEntrySpcNum (see note above)
txtEntryState
Contest Programs with Digital Mode
In addition to Amateur Contact Log, here are our contest programs that support a digital mode and the required exchange fields. Remember, you can always send <CMD><VISIBLEFIELDS></CMD> to see which fields are visible for any given program.
Africa All Mode: RST / Serial Received
ARRL Field Day: Class / Section
ARRL Kids Day: Name / Age / SPCNum
ARRL Rookie Roundup: Name / Check / SPCNum
ARRL RTTY: RST / SPCNum
ARRL School Club Roundup: RST / Class / SPCNum / Name (optional) (Please be sure to support this one!)
CQ WPX: RST / Serial Received
CQ WW RTTY: RST / CQ Zone (our software fills from call) / State (or Province)
Italian ARI International DX: RST / SPCNum
Jamboree On The Air (lots of unrequired fields)
NCJ North American QSO Party: Name / SPCNum
NCJ North American Sprint: Serial Received / Name / SPCNum
State QSO Parties (Varies - Name / State / County / Serial Received / Section / SPCNum, etc.)
Ten Ten: Name / SPCNum / 1010 number
VHF: Grid / RST (optional)
Worked All Europe: RST / Serial Received (QTCs not coded in API)
Winter Field Day: Category (use class, just like ARRL Field Day) / Section
World Wide Digi DX
If you have any questions, please e-mail me here. Please let me know when you've added interface with our software!

Revison History
API 2.2 (For programs released after 1/1/2025)
- Added GETOTHERFIELDTITLES command.
API 2.1 (For programs released after 1/1/2023)
- Added GETDYNAMICRESULTS command.
- Added additional search field options.
API 2.0 (For programs released after 5/01/2022)
- Added ADDADIFRECORD command.
API 1.9 (For programs released after 2/28/2022)
- Added GETRIGPOLLINGRATE command.
API 1.8 (For programs released after 1/03/2022)
- Added SETOPINFO command.
API 1.7 (For programs released after 5/19/2021)
- Added four WSJT-X related commands for interfacing with an external program (GETCALLQTHINFO, QSOINPROGRESS, UPDATEANDLOG and REINDEXWSJT).
API 1.6 (For programs released after 1/01/2021)
- CALLTABEVENT updated to incude additional information.
- Added <GETUSERSETTINGS> to retrieve basic user settings.
API 1.5 (For programs released after 5/20/2019)
- CALLTAB updated to correct rare focus anomaly causing the txtEntryLeave command not to fire.
API 1.4 (For programs released after 1/30/2019)
- <CHANGEBM> procedure updated so that the TXTENTRYMODE update is no longer required.
API 1.3 (For programs released after 12/22/2018 - all contest programs with a digital element have been released as of 1/2/19)
- Added <CONTESTEX> so that other applications can send the entire contest exchange to our software as one space or pipe delimeted string.
- Added <SETSERIALNUMBER> so that other digital applications can set the next serial number to be sent.
API 1.2 SEND and RECEIVE commands added for Worked All Europe QTCs.
API 1.1 (For programs released after 7/27/2017)
- Retrieve tab index list(ALLFIELDSTAB and VISIBLEFIELDSTAB).
API 1.0 (For programs released after 4/3/2017)
- Raise event when user toggles rig swap from main form (RIGSWAPEVENT).
- Raise event when user edits or deletes a record (EDITDELETEEVENT).
- NEXTSERIALNUMBERRESPONSE will be sent each time the value is calculated (following each enter, edit and delete event, in programs where serial number is used).
API 0.9 (Programs released after 01/01/2017)
- Query current QSO rates and other contest stats (QSORATE).
- Send rig control command directly to rig (SENDRIGCOMMAND).
API 0.8 (Programs released after 09/01/2016)
- Find path to the settings file.
- Find path to shared folder.
- Receive Notification of user pressing enter and tabbing from the Call field.
- Place Rig in Transmit and Receive by CW Com Port (CWCOMPORTKEYDOWN) or rig interface (RIGTX).
- Rig Interface From Your Application (N3FJP behaves just as if it was doing the polling).
- Default mode change with CHANGEFREQ now optional (SUPPRESSMODEDEFAULT).
- Ability to read and set rig interface offset and default mode change options.
- CHANGEFREQ is sent regardless of rig selection.
- When CHANGEFREQ is sent by connected app, CHANGEFREQRESPONSE is returned.
- CHANGEFREQ is sent when user clicks on a DX Spot or types a frequency and presses Enter in N3FJP Software.
- Frequency response resolution rounded to 1 Hz for BMF queries.
- READBMFRESPONSE sent automatically whenever there is a new band, mode or frequency value.
- CALLTABDUPEEVENT sent automatically when the user tabs from the Call field and the QSO is a duplicate.
![]()
Copyright 1997-2025, N3FJP Software - Affirmatech, Inc